Thursday, October 14, 2010

Halloween Wreath- Sorta

Halloween Wreath
HI. I'm participating in the Linky Party over at Eighteen25. This is the project I added there.
I wanted to make a Halloween wreath and have my toddler help. But I also wanted it to look nice. My daughter, Ella, and Eddie Ross were my inspiration. I'd seen my daughter squeeze out a huge amount of glitter blue when I was helping her to make a little bird with google eyes. The glitter glue background that resulted when I pushed the eyeball into the glob she'd squeezed out actually looked neat. A happy accident. I have also noticed she loves google eyes and wants to glue more than just two to her art projects. Bing, an idea. Wouldn't random eyeballs look sorta cute and spooky on a halloween wreath? I thought so.

First let me give credit where credit is due. I learned how to make a wreath using glass Christmas balls on a wire hanger from following Eddie Ross's blog. Here is a link to the instructions on his site: http://www.eddieross.com/eddie_ross/2008/12/no-wire-hangers-well-maybe-just-one.html. He is awesome! I did this project with my mother last Christmas who has dementia and she was able to participate. She now has a beautiful wreath to hang on her door where she lives in a community setting.

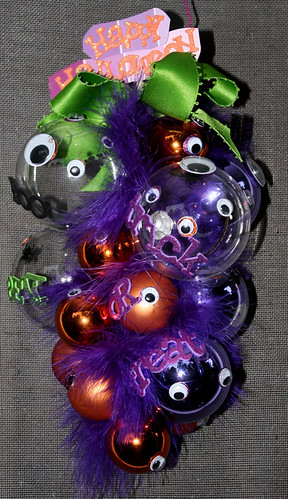
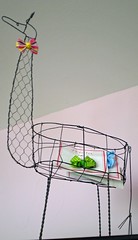
I bought purple, orange and clear balls at the store. But, I actually underestimated how many it would take. Hence, we tweaked Eddie's idea a bit and created what might be termed a vertical type swag door decoration. I purchased a purple feathery fluffy boa type thing which already had a pocket hemmed into it. Yay! I snipped the boa into peices and slide the fluff down the hanger every few balls. I let my daughter who will be 2 soon, line up the loop at the top of each ball I handed her with the tip of the purple hanger I had undone and straightened out with a loop at the end. I was surprised, but she could do it. Her manual dexterity is amazing me each day lately. Notice, I handed her the balls to use. This caused a small melt down, but then she re-entered the game and agreed to let me pick them out. I started with the smaller balls and then went larger at the top. You can't tell from the picture...but I dropped in spider confetti on the clear balls.

Ella watched as I glued the eyeballs and more spiders and some stick on glitter Halloween related words to the swag. Then I hung it outside. She now says, "Hello weeth," each time we leave our enter our home. It's funny.

I was on a budget so I stuck the Happy Halloween lettering to a purple paint sample I had. I trimmed around it so the names of each color aren't showing. Then I glued it to a spare peice of wood (ok, a pencil...I was desperate) I had. Pencils are wood, right?

Oh, and the bow as tied and secured to a black piece of pipe cleaner. I put glue on the end and stuck it in to dry.

I didn't want to involve alot of glitter, but one idea might be to dip the bottoms of the balls in glue and cover them with appropriate colors of glitter. Or you could draw a glitter spider web.

One important note...be sure to visit this project on Eddie's site so that you can know how to keep the glass balls from popping off the holders and falling all over the place.


Friday, October 8, 2010

Latest Update

I hope to blogging regularly again soon. I have been overwhelmed with my life lately as the kitchen remodel from hell continues. I am so regretting trying to paint our own kitchen cabinets. We envisioned spraying them and having them turn out like the ones in the store look. Well....so far that is not the case.

On piece of advice, DO NOT use a Wagoner Sprayer that cost 100 or less to paint cabinets! We purchased a Graco Sprayer from SW next for around 200. Still not perfect, but may be user error adn the fact that we have no area in our home that doesn't have some dust floating around. Aggghhhhh! For the money we've spent we could have paid a painter to do this. I am distressing them now, but the process is a long one and requires meticulous attention to detail. Can't wait to finish!

So, be patient with me my dear small group of readers. I will return soon with more posts and more projects.

TTFN,
Michele

Wednesday, September 8, 2010

Update on Kitchen

Sorry I've been remiss about posting lately. I've decided to take a longer break and try to get some projects done and then begin posting again. The kitchen is nearing completion. My husband (who I'm not going to call Mr. Buzzkill since he's trying to refrain from telling me I can't do this or that) tried very hard to work with the absolute worst purchase we have made- the Wagner Sprayer for around 80 bucks! He's primed and put the first coat of Muralo paint onto the cabinet doors. But, there will be some sanding taking place where the sprayer spit paint while spraying. I talked to S.Williams the other day while buying more Frog Tape and it was recommended we purchase a sprayer there for 199.00 that should get the job done. I'm all for doing that once we are ready to spend some more money.

I've had to slow down on my projects and attend to my real job lately so that I can contribute more to our income than I have been. That is another reason you might not hear from me as often for a while. But, rest assured, I'll be back with a vengeance once life calms down a bit.

I did finally get the primer removed from my toes by talking my hubby into a pedicure. I also probably taught my daughter a new curse word when I spilled about 1/2 a bucket or more of expensive Benj Moore Aura paint. I don't think I'll be buying this paint again, either. It dries just a little too fast for me and it requires two coats without using primer. I thought it'd be great to be able to skip priming and only use one coat- but that was really too good to be true.

One side project involves me painting the hallway and adding a unique stair railing. I'll post on this next!

Friday, August 27, 2010

Repurposed Candlesticks

IMG_0907aAhhhh....I remember the day about 4 years ago when a floofy doo store was going out of biz. They had zillions of cool items that were usually out of my price range. I did get my husband to buy me wall candle holder thingy I'll show you one day- at full price. I love it, but it's probably too big for my home.

Please ignore ugly shade it's currently wearing. No time to shop at the moment.

Anyhew....when I heard they were going out of business, I zipped across town to the store that already had throngs of bargain goers there. I immediately found the wooden candlesticks I had been lusting after for about a year. However, I couldnt' afford them. BUT at eighty and ninety percent off, I certainly could now. I want to say the 24.5 inch one cost around 125 dollars? I two of them up and was about to get the third when a lady grabbed it right out from under me and tried to talk me out of the ones I had. No way! Now, I didn't have my cell on me and I had a handful of great deals. The line was tortuously long. I no children at that point, so I felt it was worth it to wait. Turns out the wait lasted 5 hours!!! There were only two registers. I could NOT believe it. But after you invest an hour or so waiting you figure you have to continue at that point. Do you know once I got home I realized that everything I had was actually sconce or candle related. Oddness.

So these gorgeous candlesticks have set around collecting dust for FOREVER bc I don't know where to put them. I have no fireplace. They are too tall to go on top of a peice of furniture.

But the other day, I had an ahha moment. The decorator hadn't even suggested it- I am surprised. I would make these suckers into lamps! Oh the sheer genius of it made me smile for days. Then I got to looking at my lamp kit and thinking about the height of the lamps. Man would I have to drill a long straight hole. I was guessing a 1/2" in diameter would be wide enough of a hole.

I called the fanciest woodshop we have in town and they gave me two names of people who might be able to use a drill press or a lathe. I then checked with a lighting store who said they didn't have any long bits. This surprised me bc they say they can make specialty lamps!? Who does this if they don't have a drill bit longer than 3"?

IMG_0908bThe other day I got impatient and I also didn't want to have to locate teh person I'd be calling up with lathe or drillpress and I wasn't sure how much he'd charge. So with a handful of levels and my new drill I eyeballed it. I was so proud of myself. I actually got past the skinny part of the taper in the candlestick without coming out fo the side. It was about 3/4" by 1". I began with a small bit. Then I tried a 1/2" one. Success! But unfortunately, I did not have a long bit in this size. Not wanting to spend money on one, I decided to just chance it and drill with the 5/8" bit since I did have a long one of those. That is when tragedy struck! My poor lamp. I could have cried. I came out fo the side. You can see the problem here.


It's a good thing I started on the shorter one and still have the other one left. I'm going to try to figure out how to repair this one or at least staple cord down to the side and face that part away from everyone. And, I will call the people the woodstore suggested for the next one. My other option was to cut the sucker in 1/2 or into 1/3s, but something in me just keeps avoiding that.

Now, I've never made a lamp before, but I'm here to tell you that once you have a hole in your object, it's pretty simple. The directions on the lamp kit tell you what everything is and what order to put it on in. It did tell me to tie and underwriters knot (hey I think the Girlscout Troop I was in did go over that once, but I was probably eating cookies and talking about boys when that bit of info was passed on). Too bad Mr. BK wasn't there. The man I married is a knot tyer tier, ---of forget it....the man I married knows how to tie some knots! Whenever buy something that he has to secure to the roof of his truck, I can hardly wait to get home. I want give any further detail, except to say if he were smart he'd try to tie more knots in front of me. LOL. Well, after a few minutes of searching I finally found a decent site for showing me how to tie this mysterious knot. Here is the link: click here to go there. It's pretty easy actually.

So, I am getting ready for company. Wish me luck as I try to paint a part of my house with my toddler here. It's low VOC or no VOC paint from Benj Moore. Did you know you can use flat in your kitchen and stuff now? Amazing! They made it wipeable. I like flat bc it hides flaws in the walls.

Have a great weekend.

Tuesday, August 24, 2010

We Have Countertops and Partially Painted Cabinets

Oh boy...I am so excited that I'll soon be doing dishes NOT in the tub! Icky and gross.

Countertops were put in yesterday and the absolute black granite looks awesome -except for one spot with white sealer that did not dry clear. I'm sure the company will remedy this, though.

Below we see the progress over the last few months.

kitchenupdate

Learn from my mistake. Farmsinks are really expensive if you want firestone! I wanted a white firestone, so I opted (after an endless search for a 33-36" affordable two hole white firestone farmhouse or apron sink to transform the apron sink cabinet into a regular one. We have a false drawer front and taller cabinet doors we ordered to be put on the cabinet to make it look like a regular drop-in sink cabinet would have. I am wondering if my little tapered legs will still look ok? I hope so. We shall see....

We have been priming our paint grade Maple cabinets with Primelock from Benj. Moore and painting them with Muralo paint. We added a little conditioner in with the Muralo to help disguise any brush marks. Mr. BK has been doing most of the painting. I have only had the disasterous day with the Wagner spraypainter that I do NOT suggest anyone buy! I was using thinned down Primelock in it. I still can't get that primer off my toenails. I've used acetone remover and a file.

Tuesday, August 17, 2010

HomeSweetProgress: My Daughter's Nursery- Cute and on a Budget

HomeSweetProgress: My Daughter's Nursery- Cute and on a Budget

Hi Everyone. If you have a cute nursery re-do, you are encouraged to post your link over at The Lettered Cottage -one of my favorite blogs ever! Here is a link where you can visit everyone's posts and also link yours up as well.

Inexpensive Sconce- 86 the Electrician

For those of you who have ever waited tables, you know "86" means cancel that item on the order. So...I have always wanted a sconce, but have never wanted to pay an electrician to come out and especially wire it up. If I had wads of cash lying around, then sure.

Well, like a bolt of lightening, I thought of an idea and I googled it. Battery operated sconces- I'd buy one. Did they exist. Hmmmmm....yes they did. I didn't love the limited designs nor the price tag. I saw some in the 90 dollar range. Then, a idea formed in my head. And while shopping at both the grocery store and Lowes I saw exactly what I needed:

IMG_0879j

Well, while in the grocery store (Publix) of all places I bought a flexible LED battery operated light for 2.99. Not sure they had it priced right? I only saw one and had to ask them what the price was. I see more expensive items that are similar on the Internet. But, it's not really integral to the project bc the light gives off too much of a blue glow anyway. I'll have to purchase a small battery operated tea light or puck light for undercabinet task lighting.

While in Lowes, I saw a  black iron doololly (not a technical word) that could screw into the wall and hold my choice of decorative glass sconce shade. The iron thing cost about 3 bucks or so. I quickly walked around until I saw a reasonably priced pendant light shade. It just so happens they had one on sale. This cost me 5.99. I think it'll look nice in my diningroom. Wish I bought two. I hope they have another.

The idea was so simple -especially since the led light I bought had a magnetic bottom. I would glue the sconce onto the metal thing and then the magnetic led light would easily stick to the metal holder inside the sconce. Yippee! Finally something is working out!! Typically all projects for me have some snag.....I forgot this momentarily. (In pic below you can see my kitchen floor is dirty. That is because we are in constant renovation mode. Please pretend you dont' see that dirt!)

IMG_0883k

Ugh....first in the excitement of it all, I put only half the material for JB Weld on the sconce bottom. I waited and waited. The next day nothing had dried. Not being able to find the rest of the contents I am supposed to mix together I had to wash this gunk off. It didn't come off the rubbery thing on bottom of sconce so I took tin snips (I think) and managed to crack the plastic and cut through the rubber collar on bottom, sliding it all out and leaving me with just the glass part. Good, that is what I had wanted anyway.

IMG_0884e

Next, and this was the hardest part of le'project, I had to find some glue that would still come out of it's tube. Tried to work caulking gun to use silicone to no avail. After trying about 5 options-digging long nails and metal rods through the dried up gunk on the lid I finally had my mosaic craft glue which sticks to about anything come through for me. It also dries clear which is nice.

IMG_0888a

Here is a tip. If you don't want to hold something that needs to balance while glue is drying, use beans, rice, sugar or whatever you have on hand to help balance the item. Here you see my new sconce (pretty pretty) balancing in a plastic container of sugar. I'm waiting on her to dry.

The bad news is the LED is to blue and not strong enough. I'll either use a candle or battery operated light bulb or tealight. Once I find out and once I decide where to mount this baby, I'll holler back at you.

Email me if you too make a sconce similar to this one. I'd love to see it and I'll show to everyone else on the blog if you like.

Soon to come, I'll be making this baby into a lamp. It's long and skinny so I'm nervous to drill a long straight hole through it. I know I'd end up driving the bit out of the side. I can either cut it up into peices and drill myself, take it to the lighting place and let them assess whether or not they think they can do it, or I have some names of people a local woodcraft specialty shop suggested I call. They might be able to use a lathe or some kind of turning tool to get a straight hole in it. I'll keep you posted on this one.  I'm going to of course start with the long one bc that is just the size I want. It's 24 1/2 " tall. I waited over 5 hours at a going out of business sale where I bought these babies for 80 percent off. Then it dawned on me that my house is really too small for these to work. If only I had a fireplace I might put these to one side of it? But, I do not. I am gonig to have to make lamps.

candlesticks

Thursday, August 12, 2010

PS- Ceiling Paint

I forgot to mention in my last post that THE best ceiling paint ever is an ultra flat matte paint by Benjamin Moore. My husband and I are terrible at ensuring every little nick is smoothed out in the ceiling before painting. I've also noticed our ceilings often show brush strokes. Well, not with this stuff, honey!! I will never use anything else. I absosmurfly LOVE IT. I can't believe I just referred to the smurfs. You may be too young to remember if you are in your twenties.

I know it'll cost more, but I think I'm going to have them tint this stuff or I'll buy more and just poor a little of whatever I'm using for wall color in the ceiling paint and mix it up. It truely hides all kinds of imperfections. No, I am not getting paid to say this (smile). It comes in a yellow can is called ceiling paint.

In addition, the decorator told me that BM (I prob should not abbreviate it this way) also sells matte paint that can be wiped and cleaned just a well as any of the other sheens. Hmmmm..I don't see how this is possible. I'll be doing some research before I paint with it. I do love matte though. However, I have a sticky handed toddler living with me too.

Choosing Wall and Ceiling Colors

Hello There! Happy Thursday.

The Color Scheme - Still Choosing Between the Greens
Today's post concerns paint colors, color schemes, and my upcoming plan. I love color and have been studying up on it and collecting paint chips for months now. But, I'm terrible at it. There, I said it! Our dining room was red when I moved in, I painted it purple, yellow, tried a faux denim panel treatment (don't ask), and finally grabbed a chip of greyish brown and painted livingroom, hallway, foyer, and dining area different shades from the same paint chip. I don't remember the name of the color or which line it came from though. Oh well, I"m tired of it anyway. I love color....but I have to start admitting that I"m not good at choosing it for my home. Or I haven't been up until now (fingers crossed). Mr. BK is colorblind so he's no help. I sometimes wonder what I actually look like to him???

Example of our crazy art!
 I love how the bright green and army greens
are combined, yet it seems scary
to do this in a whole large room.
I hired a Benjamin Moore decorator to come over for two hours and advise me on my home. After she left I was wondering if I'd just wasted some green-- but as time passed her message to me began to resonate. I have a small house with furniture that is too big, so I should choose light colors if my goal is to have an airy, serene, comfortable house. We have vivid tastes in art (shown in image to the right), so it'll POP if I use a softer color on the walls. She kept choosing what I thought were boring colors...but I began to realize I needed to choose colors that blend my surroundings and help create an atmosphere I"m trying to go for which is light and airy and soothing. Sort of how you feel when you go to a beach house but Mr. BK won't let me do beach theme bc we don't live near the coast. I used to...I miss it so. Ms. Decorator told me I should NOT just be choosing dark saturated colors bc I love the color. If I'm dying to do a darker color, she suggested I use it for a smaller area like the bathroom. So..... my original Martha S colorscheme is out. I had chosen colors from her woodsy scheme that has leaves in the corner. 

So, my couch is an olivey army green velvet and she suggested I pick a wall color for that room that was a lighter value/shade/hue (I am not sure which word fits here --you can see how the months of studying really stuck in my brain, can't you?). I'll go with shade. I'm to choose a lighter shade of this olivey green couch's color and use it on the walls. I could even choose an even lighter shade of it for the ceiling. I couldn't tell what the colors she suggested looked like from the Internet, so because SW actually gave me a whole color deck fan thingy, I decided to use their colors as the ones to choose from. I then spied a book that had the tannish green color being used on the cover (see below). It also had some other colors that I liked with it. I decided to match up a gold and blue with the book and match up the green hue to couch. You can see the book here (I blurred out title bc of legal ramificatons if there are any?) Someday if I learn how to do a giveaway I'll have to see who can send me the title of this book- LOL.


On to the renovated kitchen dining combined area.....Ms. Decorator told me my chandy, a birthday gift from two years ago, looked dated? I decided she was wrong. I would love to replace it with a blown glass chandelier or one with crystals and a drumshade around it...but need more mula, mula, mula. (Mr. BK already almost died when I went out and purchased a new drill and weedeater the other day. Don't ask permission, ask forgiveness instead. This philosophy was taught to me by a very successful business woman friend.) I do hate this chandy though for the simple reason that it gives off no light. I'm going to try putting in some brighter bulbs.

I showed the decorator some pics I love of kitchens that use a red and blue color scheme. She thought it'd work fine. Yippee!!! Wanna see pics of my inspiration kitchens? Well....I am scared of getting sued. I am currently asking permission to use them first...but here is where you can go to see them....

Image 1: It's called the Park Avenue dining room and it's designer is Katie Ridder. There is a gorgeous blown glass chandelier that is white and red. The room is painted blue and there are green curtains. This lady really knows how to combine colors!! Until I receive permisson to use her image, you can see the room in a post over at Cococozy's blog here. It's the bottom image. I'm hoping if I use some red in the kitchen it'll be ok and flow alright with the adjacent rooms. I figure red and green go together and since the light green room will be beside the light blue kitchen it'll be ok.

Image 2: I also love the idea of bringing red into the dining area using some red bamboo chairs that I think might be called Chinese Chippendale chairs. Click below to see the image using these. I'm not sure who to ask for permission to post the image and until I get better at understanding what images I can legally use I'll err on the side of caution :) I saw it somewhere and saved it in my house and yard ideas file.

Well, enough about color for now. I have some "real" work to do . TTFN, Michele

Tuesday, August 10, 2010

Sraying Primer on the Cabinets

Hello My Dear Readers-
Might I suggest you rent a very high-end professional paint sprayer if you choose to spray paint your cabinets or other items in your home. I bought a Wagner that I had read favorable reviews on. Funny, how all the reviews were bad at the end of yesterday when I looked it up again.

paintonfeet

Yesterday was a comedy of errors! I couldn't find the paint sprayor, I spilled a can of expensive PrimeLock primer from Benj Moore. I spilled some mineral spirits as well and ran out of them to clean the paint sprayer. I had to rush to the store to buy some more spirits before the oilbased primer dried in the gun and damaged it. Agggh!

After 3 trips to BM and 1 trip to Sherwin Williams, I ended my day covered in primer. My feet up to my ankles were solid white. My toddler looked at me in disgust as I showed her how grass was stuck to the bottom of mommy's foot. As I sprayed primer on the cabinets layed out in driveway ontop of blocks and random peices of wood, I kept dragging the extension cord through some of the cabinet that were already painted. The sprayer frequently "burped" air causing it to spit out drips of paint on what looked like a perfectly sprayed cabinet. I stepped in paint that had spilled on drop clothes, I breathed in fumes, I got paint on my glasses and face and all over my legs and arms.

Mr. BK stayed inside with the child and suggested many times that we should have thought this out better. Ughhhhhh! Procrastination seems to always be his answer. He kept saying if they were up higher we'd have less bugs trying to land on them. Well, maybe so, but I figure bugs can still fly waist high had they been on some sawhorses (which we do not own).

Hopefully things will go better this next round. I plan to either rent a sprayor or handpaint. I'm using Muralo paint from BM which is an excellent self-leveler. I think I bought high-gloss. Below is a picture of a couple of cabs sprayed with primer. When the gun was working correctly, I have to admit it did look really professional.

primed-cabs

I put on socks and shoes, but wore shorts to the store to buy some coffee icecream. People looked at me weird. That is when I noticed I had paint all down the backs of my legs. The bath with a vat of MOJO didn't remove all the paint. The picture of my toes is from today.

Friday, August 6, 2010

Small Things Make Me Happy -A Little Whimsy Here and There

Digging around in that box of crap containing tons of metal things I have no idea about, did pay off the other day. While I was making my shelf attached to our cement wall in basement, I happened upon a cute little piece of metal that Mr. BK told me he thought was a washer when I asked him about it later.

This is a fish I bought years ago at a boutique for about 7 bucks. I don't know where it's final resting place will be yet, but I love it and want to make some of my own in the future. I glued the washer to the fishy to dress him up. Isn't he too cute?

Before (Actually, I remembered to take before shot after I'd already put wood glue around eye- we'll see if this glue works)
IMG_0707h

After
IMG_0708g
The artist signed his piece F. Terry on back. Not sure who he is. Love his idea though.

Ripping versus Crosscutting & Using the Right Lipstick

Choosing Blades

Hello there! When cutting the stiles (front frames of a cabinet) you need to be able to cut pretty straight. I was able to cut one using a borrowed table saw, but we returned it and are now left with a circular saw. Mr. Buzzkill went down to the garage with one of our cabinets that needed a stile cut. I was upstairs with our sweet toddler, Ella. We heard alot of noise and smelled some burning wood. After much clamoring and what I guessed was muffled cursing coming from the basement, Mr. BK came up and showed me a cut stile. It was brown and burned on the end which is ok since it will be against a wall anyway- plus we are painting. But he announced the cutting of stiles with circular saw just wasn't working. Agghhhh! If it isn't one thing, it's another it seems. Neither of knew what to do, so I emailed our nice sales support guy who is part owner of thecabinetjoint.com where I purchased our RTA cabinets. He suggested that my husband may have been trying to use a crosscut blade instead of a ripping blade. Ripping blades cut with the grain of the wood. I also researched hard maple which is what our cabinets are made of and found it we were dealing with one of the most difficult species of wood to cut because it's really hard wood. Who knew there was such a difference in blades? Not I or Mr. BK. You learn something new everyday. I also learned we needed a carbide tipped blade to cut this hardwood.


Next day I ran to Lowes and stared at the dozens of blades. They paged the one knowledgeable woodworker. I showed him how there were ripping blades with a few teeth and then finishing blades with more teeth. He suggested I use a finishing blade (but it did not say it was for ripping). Well, knowing our luck, I just purchased both.

 
I was debating on which package to open so I could return the unused one. I called an uncle of mine who wood works and he said open the one with fewer teeth. The regular blades are called framing blades. They are round and they go in the saw. Mr. BK kept repeatedly asking me if I was sure I knew what I was doing. I figured we know about the same amount so what would it hurt to let me do it. He wasn't very happy when I asked him to take my picture for my blog which is thinks is a waste of my time (sigh).

 
So here is me in front yard successfully ripping through the stiles like they were butter! Ha. Can you spot what is wrong with this picture? I've put red Xs to give you a hint.

rippinghardmaple
  1. No shoes. Shame on me. I did wear goggles though.
  2. I really need to get my roots done as you can see.
  3. There is excess glue that did not get wiped off cabinet which will need to be scraped with razor blade now bc it's blocking the feet that are to go under the sink.
  4. My edging job with the blade of weed eater turned 90 degrees did not really go so well as you can see. Ahhhhhh me. I want an edger so bad.
Dry Fitting Sink Base

 
Next, I moved the sink back into the house and it was time to use the hole cutter that attaches to the end of the electric drill. We had our plumber move our pipes to the wall and we needed to drill holes for the pipes to slip through. Mr. BK looked skeptical. He asked me if I was going to be able to measure and make the holes where they needed to be. The more he doubted I could do it, the more determined I became. I am woman hear me roar! I was thinking of the two major things he has done wrong to our precious cabinets that can luckily be fixed with wood putty since we are painting them. I will refrain from describing and posting pictures of these mistakes online because I'm trying to be nice about it. Needless to say, be prepared to go to counseling with your partner after a diy kitchen remodel!!

 
I explained to him that I was planning on coating the ends of each pipe with lipstick and bumping up cabinet next to them so I would have neat little round lipstick holes showing me where to drill. You can imagine any man's reaction to that plan.

IMG_0674b


IMG_0675a

 
But IT WORKED!!!! In fact it worked so well, that I could not pull the cabinet forward again once the pipes were in bc one pipe was really snugly fit and the copper cap was causing it not to be able to be dethreaded back out out so that I could sand the edges of stiles to neaten up my slightly crooked cut. However, I learned two things:

  1. Wipe off lipstick carefully after the pipes are threaded through the holes. I and Mr. BK got it on our hands and the cabinet. Oopsy (smile).
  2. Drill a small hole with regular bit through the lipstick ring and then drill large hole from front side of cabinet so the splintered wood is on the backside.
Then it happened...I noticed the entire cabinet was higher than all the rest of the ones that had already been installed next to them by my husband. I gave up and refrained from crying. Mr. BK (hands covered with red lipstick) was none to happy either. Luckily he spent the next day undoing all his hard work and shimming up the cabinets that were installed so that they aligned with the sinkbase. I made the slight mistake of letting him see me put the 4 foot level over the run of cabinets to just check for myself. Not a good idea. Another reason we will be going to therapy after this is done. Don't worry, we will weather this storm!!!

I may even consider changing Mr. BK's nickname on the blog soon. As I called him at work to ask about something concerning a project and he didn't make one attempt to discourage me. I'm seriously thinking he might be starting to trust me a bit more when it comes to this stuff. I hope so.

Wednesday, August 4, 2010

Attaching Stuff to Morter

Well, like I say in my blog intro....if I (the queen of becoming frustrated and sidetracked) can transform this house then you can certainly rest assured you yourself can tackle a diy project and be successful.

After much arguing and frustration regarding the weeks (did you hear me, WEEKS) of remodeling our kitchen, I decided the true root of the problem was that our basement is chaotic and totally disorganized. Figuring if I could organize the space in about 7 hours, I could alleviate Mr. Buzzkill and I's frustration that comes from losing a tool every ten minutes it seems. So......I decided after surveying the landscape down there in the dark unwaterproofed basement, that we needed to get some tools we commonly use out of corner so we could stop having to climb over the one new and one broken lawn mower and other items to get what we needed. After that, I was planning to totally organize all the tools on the workbench next.

In this segment, hopefully you can benefit from my pain if you don't know how and want to know how to adhere something to morter....say a window box to your brick house. I want to do this eventually, so I'm glad I finally learned how to do so....though I was hot, frustrated, and made 3 trips to our local neighborhood hardware store where a variety of old men viewed me with skepticism each time I walked in asking questions and buying more stuff.

Here is what I accomplished. Next I'll show you how to do it.

IMG_0712

I did this wrong sooooo many times, that I have a very hard time remembering exactly how it all went down....so I'll spare you having to read about all of the mistakes, but I'll attempt to point out any pitfalls along the way.

After digging around in some of Mr. BK's containers filled with odds and ends, I found what I thought would work. I compared it to what he'd done in the past and it seemed to match. To match what I will be telling you to do, you need some of these parasleeve things...
correct

OMG...I just found this link which I so could not find during this project and needed! Agghhh! OK, it cannot be said enough times. Do NOT take apart the parasleeve anchor. Why? Because it expands when you put it in the wall and you can never get it back out! Very impt.

Don't make it look like this... (can you spot the difference here?)
IMG_0689i

Or you'll end up with this problem....as you can see below I can't take off the nut and washer because the wider end of the anchor is sticking out and not in the wall where it should be.
IMG_0690h

Also, don't take off the nut and washer like this, or you'll end up having to hold the anchor in place so it won't get lost in wall while you slip the wood over it.
 IMG_0693e

There are so many do nots that I did, I was left sweating and cursing while trying to hold the screw in place with my jewelry pliers and using a diff pair of pliers to turn the nut. Each time I turned it the screw would turn with it and nothing would tighten. This was due to me removing the plain metal part that goes around the anchor. No picture of this mistake.

So, what do you do...

1. Read the instructions to find out what size mortar drilling bit you need and go buy it.  In my case, the instructions said to drill a minimum of  1.5 inches into the wall and to use the same size drill bit as the anchor. A bit for drilling morter has wings on the side of it as seen below.
IMG_0688j

2. Mark your locations for drilling after using a level to ensure they are level.

3. Drill a hole. You can mark your drill bit if you need to so you know where to stop. I marked mine with magic marker. Wear some goggles and blow the dust out of the hole with something. I used my breath so that probably will cause me some health issues down the road...I hope not! You will be surprised how easy the drill goes into the morter. I was drilling into what I guess is called a cinderblock. Now in pic below you'll notice I've already made a mistake because if you look closely you can see part of the anchor is in the hole. Unfortunately, I didn't get a pic of just the plain hole. But you get the idea here.
hole

3. Now, drill a hole in the wood you want to adhere to the wall. If you are hanging something I guess you can skip this step. I used the masonry bit to drill the wood and it seemed to work fine.

4. Next, position your anchor in the hole in the wood and then in the hole you just drilled in the morter. Do NOT take it apart!! The end with the washer and nut should be towards you. You are going to need to tighten it later.

5. Take a hammer and bang it in. By the time I got this right, I was too tired to take any pictures. Sad, I know.

6. Now, tighten that nut up snug against your board. If you can find one of these, you tighten it around the nut. It fits multiple size nuts. I think it's called a crescent wrench. I don't know if it's spelled like the rolls or not. LOL. Please ignore the filfthy state of garage. Dog hair in pic so I'm posting this small in hopes it's less noticeable.
IMG_0697a

(Off topic....our new fridge makes the most obnoxious noises. It just did. I am told all new ones do this? I hope it's just due to icemaker not being hooked up yet. It could seriously wake up my daughter from her nap!)

7. Give yourself a pat on the back.

(Well cr_p...it did wake her up. I better run!)

Friday, July 30, 2010

So Many Projects....So Little Time

Toddler sleeping and if I tiptoe to bedroom to retrieve my camera, sure enough she'll wake up. So, what have I been up to these days? Posts to come on the following:

-Working on turning old ugly rocks into pretty ones to surround toddler's sandbox. Gel stained some yesterday. Thinking of better idea that is less dangerous to environment and my child.

-Putting together gallery for Ella's works of art! In process I learned how to crush beer caps and that magnets stick to them. Don't trust the magnetic paint solds at Lowes if it's dusty and old.

-Cutting mirror with glass cutter may be harder than I thought. Tried it out yesterday and broke large piece. Agghhh!

-New GE Appliances arrived. Yay!! Wow, ceramic cooktop instructions make me think it'll be alot more upkeep than I ever realized.

-Electrician gave us pleasing quote and we don't have to switch from fuse box to breaker box. Good news! Meanwhile, we are in danger of a fire. I sleep on the couch alot just in case.

-Need carbide ripping tip for circular saw if you want to cut through hard maple- which is one of the hardest North American species of wood to deal with. Wouldn't you know that is what our cabinets are made of. Yes, I know, I shouldn't end my sentences in prepositions. But I'm in a hurry bc my child could awaken at any moment.

-The kitchen is much safer now so Ella is able to follow me in there which has helped us avoid alot of tantrums with her pulling on the baby gate. We are also practicing going down our four stairs from upper to lower level.

More to come. Just wanted to drop a line or two to keep my 19 visitors and two followers updated. LOL.

Tuesday, July 20, 2010

Kitchen Update: The First Cabinet...I Could Wait No Longer!

WeIMG_0509resizedll, after waiting and waiting and waiting and waiting while Mr. Buzzkill (heretofore I shall be calling him BK bc I'm tired of spelling it out) sanded and sanded and mudded and sanded some more, I could stand it no longer. A couple days after his return to work I did exactly what he said not to do. I asked dude who sold us cabinets if I we should attach all of our wall cabinets together on the floor and raise them up as one, or should we begin with the corner one. He said to begin with the corner one. BK wanted to do the other thing where we hook them all together first. BK had already installed 2x4s along the wall for the back of the wall cabs to rest on. His plan was for me to hold the front while he drilled in screws all along the back of our precious cabs. Well, after R-E-A-D-I-N-G (as you know if you one of my at this time seven visitors) Mr. BK does not believe in reading. Anyhow, after reading about how we should install our Conestoga Wood cabs with beautiful plywood sides and finished maple insides I found out we only needed to screw in the cabs on the top and bottom cleats. These are hidden, unless you were to squat down and really look under the cabinet. I guess some short kids that visit might see them. Oh well. Anyhew, then you are to use a skinny screw and predrill holes to screw the stiles together all along the front. Thank goodness I read this or I'd have screws all along the backs of our cabinets.

Well, I did it. Whenever I am told I can't do something (which seems like alot lately) I am all the more determined to do it. Case in point, I mowed the entire backyard. Mr. BK actually admitted he was surprised and impressed that day. Then our lawn mower broke a few mows after that and turned into a push mower. I at that time announced I would no longer be mowing. Back to the story....I was supposed to be working and earning money, but instead I used a tall table, some books, bricks, and some flipped over pieces of spare floor with soft foam on the back to balance the one angled corner  cabinet that will have glass in the front.

Following the instructions I had gathered from some quick Internet research, I nailed in some long finish nails to ensure I knew where studs were. I do not really trust our studfinder. It has a mind of its own. Then I screwed that sucker in and checked it for level with our 4 foot level. FYI, using anything shorter won't really give you  a true reading. I had to convince Mr. BK to buy a 4 foot level. He wasn't going to do it, but I added it to the list of required materials sent from thecabinetjoint.com and made it look like they had put it there. LOL. It worked.

In the image you see my husband added another cabinet to the right side of the angular one. I really should have shot the picture of mine balancing on my tower of books. One reason I went ahead and installed it was because the cab to the left of the corner one has an extra wide stile that needs trimming. I knew we would have to return my brother's table saw soon so I wanted to use it while I could to trim the stile of perfectly straight.


Monday, July 19, 2010

Kitchen Update: The Wall Is Gone!

Step One: Used my womanly wiles to talk husband into removing cabinet and tearing down sheetrock so I could envision the two rooms as one space.

Step Two: Building inspector let me know we should have pulled permit for step one. Oops. Had neat joist to hang my daughter's swing from for a while that allowed me to do some cooking.

Step Two and Half: Wait for a very loooooooooooong time while husband sheetrocks. He had tried to hire someone but I begged him to let us do it ourselves. I finally got tired of waiting and insisted I get to try. I bought hot mud that dries quickly and didn't really do any better. Shame on me. I should of listened to Mr. Buzzkill! I decided playing with and taking care of our toddler was much easier.

Step 3: Hire professional to put finishing touches on the sheetrock and stand back in awe of how easily he does it. Wowy! Does the room look huge! I is so very excited!!!!! Yippee.

wallgonesteps

Sunday, July 18, 2010

Kitchen Update: The Day the Cabinets Arrived

Since I've been working like a dog and am catching you up on all our kitchen update stories, my prose is in past-tense, sorry. The day the cabinets arrived was a happy day...but a crazy one too. That same day Mr. Buzzkill (who was NOT a buzzkill that day) said we should go ahead and buy the flooring since we had just been paid. BAM...I was off like a shot buying those suckers and begging the manager to let my husband pick up the 46 boxes later that day. Manager was adamant we had to get them THAT day. I was terrified someone else would decide to do their flooring in the same stuff and we would not have enough. Well, I made it. Yay! Then , ring ring, it was Fed Ex or UPS? calling to tell me they were arriving with my cabinets! OMG, they were a day or two earlier than I was told. I was also told we couldn't keep them in the basement for any length of time because of the moisture. Suddenly we had no walking room in our house and we were all very tired. Luckily my teenage nephews agreed to come over and help us move the cabinets upstairs and my brother arrived (I forgot he was staying with us overnight to attend a convention in town) to book it down to Sam's and get the floor.

The cabinets ARE beautiful. Because we are going to paint them ourselves the price dropped like a rock. They were under 5K and have plywood on all sides, dovetailed drawers, Blum hardware, finished maple insides, gorgeous detailing on the outside, and we got tons of Rev A Shelf add-ons. I was and still am in awe. Putting them together (except for the lazy susan) has been a breeze. We have everything together except for the pantry at this point. We also have not installed a drawer, the doors, or any rev a shelf equipment. I have to say I've been very impressed with the service thecabinetjoint has provided. I have pestered one of the owners to death with questions and I am really a small time sale compared to others who order from them. He has been timely and polite with all of his responses. Also when we had a piece missing, he had another sent to us immediately. When we had one piece that was cracked, BAM, he sent another no questions asked. I get the keep the cracked piece. I am planning on repairing it with woodfiller and using it as a mirror frame I think.

I am planning to prime these beautiful cabinets with PrimeLock from Benj Moore, paint them with Muralo Paint from Benjamin Moore using a Wagoner Sprayer, and then I'll lightly add some pewter/gray colored glaze. Fingers crossed all this works!

IMG_0409_1resized

IMG_0410resized

Saturday, July 17, 2010

Kitchen Makeover in Progress: Flooring

Hi All,
Redoing my kitchen has been exhausting to say the least! Word to the wise, prepare your walls before your cabinets arrive. My husband kept saying he did not want to jump the gun and would do everything during his vacation. NOT! Here we are a month later still not even 1/2 done.

Sorry... I haven't written in so long because I'm constantly working on the kitchen, playing with my toddler who is whining constantly at this stage of her life, or checking on my mother. She has dementia and just turned 65 so I had to learn waaaaaaayyyy too much about Medicare!

One of our first projects involved pulling up the nasty nasty berber carpet in our living room. I found a steal of  a deal on some laminate flooring! We decided on laminate because it is hard to scratch and we have a Great Dane and Ella, our toddler. After weeks of begging and trying to convince Mr. Buzzkill that laminate was the way to go if we wanted to also be able to afford nice counters and appliances, he finally agreed to it. The search was on!!!! You won't believe me...but the floor we bought and is shown in the image above is about 76 cents/ sq ft and has foam backing already attached. It's super thick and has a 25 year warranty. I bought 48 boxes of it at Sam's Wholesale after Mr. Buzzkill read the reviews, looked at the stuff in person, and it passed our home test. There we were in Sam's clicking together a large hunk of floor to see if it looked realistic. I was thrilled when my husband actually thought it was pretty nice looking. The image above doesn't do it justice. Please ignore the painted splotch of green on far wall...I'm deep into the depths of color testing. This color is Martha S's Bay Leaf Green. Mr. Buzzkill gave it the thumbs down and said it looked like vomit. Agghhhh! I agree it is not good for an accent wall behind the couch...but I could see it in our kitchen. However, I think I've found something even better. I'll fill you in no another posting.

For the home test, we bought 2 boxes and assembled a hunkof floor in the kitchen. I invited my dog to play on it, I smashed banana into it, dropped random things (more detail in link to my review), and I stomped on it in some of my highest heels. (I won't even tell you what Mr. Buzzkill suggested we do on it!) Not a scuff...until I dropped a can opener from waist high...but we decided that would dent any floor and that we would be especially careful not to drop can openers on the floor. I was also able to disguise that particular dent extremely well using a stain marker I already had around the house.

For more in depth information, you can see my review of it at this link: http://hubpages.com/hub/Golden-Select-Laminate-Flooring-Review. For the price, it is an unbelievably attractive flooring option. I know it sounds hideous being this cheap and from Sams, but it is awesome!  I also have pictures of it at the above link. We have 1/2 the floor down in the kitchen as well as all of it down in the living room and it has performed beautifully thus far. Why just this morning, my Great Dane who is developing a fear of thunder came inside while it was storming. I put her in the back of the house because my daughter was eating. I didn't want her slobbering and begging for food. Ella also loves to throw her food as well. Suddenly Abbey jumped over the baby blocker (it's a homemade huge thing I made from 2 x 4s bc I could not find a gate with a right angle) and landed on the floor. I was sure a huge jump like that probably made dents or scratches of some kind. I quickly ran over to inspect and not a thing -except of course dirt and dust. I swear I am having a hard time keep the floor clean with all this construction going on in my kitchen. Plus, my dishwasher broke and I am not always putting my daughter in the highchair to eat. Shame on me. This is part of the reason the floor is looking dirty. I have been dust mopping, though, not every day. I plan to be all domesticated and enjoy my routine cleaning after this dam* kitchen is installed.

IMG_0514resizedOne more tip...as I may have said before, my husband doesn't like to R-E-A-D directions. After seeing the last cabinet install and how he put in the engineered wood flooring (before I knew him) I have been keeping a close eye on him. Hopefully, he won't ever read this blog. I guess since he doesn't read much besides financial news and play solitaire on the PC I don't have to be too worried. Anyhew....I do read adn I discovered that one should use a Japanese Handsaw to inexpensively cut the baseboard when you want your flooring to go under it. Did our previous flooring go under the baseboard? I think you can probably guess the answer to that one. NO! Well, I asked Mr. BK what saw we were going to use to cut the baseboard and he showed me. In retrospect it might have done the job...but I hightailed it to the Woodcraft store and bought myself a Japanese Woodsaw which I have read about alot in other woodworking books. It was about 25 dollars or so. It is really sharp and is used for making smooth cuts. It is also cool because it cuts on the backward pull instead of when you slide the saw forward like an American one. I'm stronger pulling back than I am pushing forward so I love this thing. Mr. BK and our friend we enlisted to help put down flooring with us for a few hours also grew to love it. You do have to watch that you don't saw into a nail though. I keep grabbing it up and doing Mr. Miagi moves with it while saying things like, "Ewwwwwaaaaachi WA!" and kicking my legs out alot. Mr. BK gets annoyed and also nervous I'm going to hurt myself when I do this.

Thursday, July 1, 2010

My Daughter's Nursery- Cute and on a Budget

nurserymontage

I wanted an adorable, unique nursery for my little girl that featured a jungle animal theme. Having little money, I had to use my creativity to make my dream come true. Searching endlessly for a jungle theme using feminine colors led me to believe there was nothing out there. At least nothing that matched the black furniture we were using for her room. At the time I was pregnant there were few bedding sets that had a little black in them. I’ve seen more since this time. I found a gorgeous black armoire significantly discounted because of one scratch. I then bought a black baby bed to match. We found the typical looking diaper changing table for sale on Craigslist for 20 bucks. It was wood in color, so my husband sprayed painted it black. He didn’t prime it though so I see some of high gloss spray paint used is now chipping off on one corner. I chose this type of changing table because I knew it could double as a book shelf and holder for toys as she outgrew the need for a changing table.

curtain
I’m not a terrific sewer, but something about knowing it was for my child, brought out the best in me. I was determined to find the materials I needed to decorate the room and sew my own bed skirt and window toppers. I’m happy to say it turned out great, in my humble opinion. My mother and I went to the material store. She has dementia, but can still get out and do a few things. She found a gorgeous luxurious fabric in the upholstery section featuring a silver and black diamond design with a zebra in each diamond. I had to have it though it was pricey. Luckily when I went back to buy some more of it because I ran out, it went on deep discount and I got it for a steal. You can see how I used it in the curtains in the picture above.


I bought a pattern for making crib skirts so that I didn’t have to measure out perfect squares. Wish I had known I’d be creating a blog so I would have taken pictures along the way. A bedskirt is simple. You just buy some cheap muslin fabric for the part under the mattress that isn’t seen. Basically you cut rectangles out for the middle white part and the sides. Then do a simple rolled hem around the front, back and side panels that will be attached to the muslin. I didn’t follow the pattern completely because I wanted some pleats on the front and back bedskirts. I just increased the size of my front and back panels by a few inches and pinned in a pleat. I sewed all the panels to the muslin square and voila I was done.

I decided to buy pink and green bedding and bumper for the bedding. It looked so cute. Later I cut out squares of corresponding patterns to make the comforter, but I never assembled them all. Had little Ella before I could get it done. I was given so many blankets it didn’t matter, plus I had heard a newborn doesn’t use the comforter anyway. I chose a green dotted sheet and a pink bumper. I also purchased a less expensive pink sheet as well. It all looked great together.

ribbonchairrail

Using the bedding colors, I found two paints that I felt matched perfectly. Mr. Buzzkill (who wasn’t really a Buzzkill at anytime during this particular project) painted the top part of the room pink and the bottom green. Wish I had known about frog tape back then. I could have created a perfect line between the two colors and hand painted in a different color. I considered a chair rail, but then I saw the most perfect ribbon. It was black with silver polka dots. Having read about gluing a ribbon onto the wall as a chair rail some time ago, I decided to give it a whirl. I used a very light bit of Aileens tacky glue and a laser level to ensure it was perfectly straight. I glued it on over the space where the two different colors stopped. It has held up great with no problems whatsoever. I even saw where my daughter had started picking at it through her crib rails and it didn't loose. Now as she get's stronger I may have to pull the crib out some. Everyone who has visited the nursery keeps thinking I painted the ribbon chair rail with a stencil or by hand. The color of the ribbon tied in the with the zebra bed skirt perfectly.

secretpart_curtain

Feeling more confident in my sewing abilities, I bought a pattern for simple curtain toppers/swags. I had bought a green fabric with a little bit of black thread running through the weave on deep discount way back before sewing the bedskirt. I decided to incorporate it into the window toppers along with zebra fabric. You’ll see that it looks pretty cute, despite the fact that I’m not a great sewer and I ran out of fabric. I now have a secret spot to hide jewelry or other goods when we go on vacation –if ever! (See in image above).  I really need one. I wasn’t sure about my ability to sew rod pockets so I just threw the toppers over the black pole and they hang perfectly.

I needed some nursery art. I’d bought a little wooden sign over her bed along with the letters of her name made out of wire covered with pearls. This was a splurge at around $15 each. I was glad I named her Ella and not some long name like Charlotte (smiling).

hotpinkelephant2

Next , I looked through my scraps of material and decided to make jungle animal silouhettes out of them. I primed and painted over two ugly paintings I had from a painting class I had attended for fun. I ironed some backing onto the materials I wanted to use to give it some stiffness. Looking on the internet I found some silhouettes of animals I liked. I blew them up to different sizes and printed them off. I had to tape them together, as some were too big for the printer. I traced the images onto the fabric and cut them out. I then ironed the cutouts onto the painted canvases. However, I’ve had to since glue them on because the interfacing didn’t hold well.

clayart

I also used some of Martha Stewart’s cookie cutters I had been given as a gift years ago to cut out shapes in porcelain clay. I happened to be taking a clay class for fun. I rolled on various lacey textures and glued them to canvases with tulle bows attached to the top. If you don’t have access to real clay that is fired, you could probably make these out of salt dough, paint them white and spray them with a gloss preservative. You could even die the dough if you wanted colors. Also you could use frog tape to paint stripes on the canvases to which you are adhering your art work.

lamp
I created a zebra lamp by cutting out the zebras from the fabric and gluing them onto the shade I had made. I used a adhesive shade from Hobby Lobby which comes with a template for cutting out your base material you use to cover the shade. I added some fruffy ribbon and voila it was ready for the black lamp base I already owned. You can see I ran out of ribbon on the back, but we were too poor at this time for me to buy some more. Basically living off one income at this time. My contracting work had slowed to a snail’s pace.

Gerry-Giraffe-forblog

Oh lucky day thought I when I saw Jerry Giraffe just waiting there at Anthropologie (on sale for $17) for me to buy him and take him home. Then with the addition of a few extras, like a cute clay elephant my mother made for Ella in clay class and a large zebra coffee cup for flowers, I was set. Oh, and I found a super discounted rug that pulled the whole room together. Still cost me a pretty penny, but the store told me it would have cost over a thousand on special order. The person who ordered it didn’t want it. I got it home and it felt a bit lumpy where the squares of carpet had been attached. But, you know, the more we have walked on it, the less lumpy it feels. I barely feel any these days.

Last but not least, I had my husband spray paint an old rattan chair I bought from Pottery Barn in my single days. I bought cushions to match. It wasn’t all that comfortable and I can’t rocker her in it, but realistically we always ended up in the living room watching tv and rocking her there.

BLOG_GiraffeBowHolder

I almost forgot…this is Mrs. Bowregard. I tell Ella she has a high regard for bows. I could not believe my good fortune when I saw this little cutey for $8 in a gallery of artists. There were only a few bows at first, but now she is littered with bows from top to bottom and Ella loves choosing one each morning.

My only regret (or so I thought) was not having time to paint the ugly ceiling fan white. However, it turns out babies are mesmorized by ceiling fans. I wrote an article about it, in fact. You can see that here. I was glad the ceiling fan stayed ugly brown when she was little because it helped it show up better against the ceiling for her little eyes.

Monday, May 24, 2010

Upcoming Projects

Lest you think I am only focused on this kitchen I've been discussing in pasts posts, there is much much more to be done. Following are some of my projects in process...

I'm buiding a raised garden bed on a slope. I also plan on building a sand/water play box for my daughter that is shaded somehow so that she can happily play along side m in the yard while I finish this project. Not sure if I'm too late on the growing season this year, but at least I'm laying the hardscaping down for next year. I tell myself this when I get discouraged about my lack of time. I need to make yet another trip to Lowes for more landscaping timber. I also need to get my husband to show me how to work the thingy he uses to cut metal. It's so scary -flames shoot out. It'd come in very handy to be able to use it though.
IMG_0229

Next, we have my attempt at making a large bed that will probably be filled with star jasmine vine (or maybe vinca vine); it needs to be fast growing because I am very impatient. I plan to cover areas of the yard that are ugly where no grass grows. I've posted off this area to protect it from Abbey, our Dane who would love to dig in it and also do her business in it I'm sure. I've been slowly collecting newspaper and cardboard boxes to use as weed cover. My mom lives in a retirement like home (she has early onset dementia) so I received permission to take home their newspaper from the recycle bins. There is tons and tons of it! I put it in my daughter's stroller when she's not with me and stroll around gathering paper. Lots of old people start to comment on "the baby" only to see I've got loads of paper in there instead. I get lots of funny looks. So far these cheap wooden stakes with yellow caution tape wound around them seem to be keeping Abbey at bay. I'm covering that with pinestraw. I'm wondering if bales of pinestraw often have poisonous spiders in them. I saw a brown spider crawl out of one last night as I was hurriedly covering some newly gotten papergoods from the independent living facility. Next I'll root cuttings from my flourishing star jasmine that grows out of control up a trellis support for the house or I'll buy vinca vine. The jasmine vine nearly attacks the neighbors when they knock on my front door.
IMG_0226

Here is Abbey eyeing the new bed. (Hmmmm....I must figure out how to pee in there).
IMG_0227

Another shot of the slow process of collecting newspaper and wetting it down, then spreading pinestraw over the top. I'm sure our old air conditioner will break soon seeing as how we are spending all we have saved on a new kitchen.
IMG_0232

This is where many projects are carried out. My husband is down there now cleaning out the basement in preparation for the cabinets we've ordered. Notice the large pieces of mirror I received FREE from a post on Craigslist. I am not sure what I'm going to do with these, but I'm thinking I'll make my own mirror with frame and use it to make some small room in my home look larger. I have lots of small rooms! I have seen mirrors that were pieced together and look pretty good. You'll see what I mean when I get deeper into this project.
IMG_0235

This is a really OLD frame I picked up at a church bizarre sale for $3. I showed it to my collector friend and he didn't think it was very valuable due to it's deteriorating condition. He guessed it to be over 100 years old though. The decorative pieces are falling off. So I turned it around backward and tried to make something...not going so well. Not sure what will happen with this project? Please submit some ideas if you have any? I'd make a mirror out of it and paint/guild the front of it, but the corners are falling off.
IMG_0238

You can see here what I tried to do (snicker) to the backside of the frame. I was going to install a mirror that would cover the chipped ledge. I am not happy with it though. Plus I hate the colors. What was I thinking. I am terrible at choosing paint colors. I was going to cut tiny pieces of wood and paint them various colors and glue them into the center recessed area that is white in the image below. I was thinking that wherever there was a nail in my way (you might not be able to see this in the image below) I'd chisel out that part of the little wooden block. Hmmm...this is definitely going to be in the backburner for now.
IMG_0236

Gave Mr. Buzzkill the stink eye after I described this pergola I spied at an estate sale on the way home from church. It was only $50. I sure hope it has all the peices to it. I can't wait to see what it looks like. The owner said is attaches to a deck. Well, we don't have a deck. That is yet another project I'm brainstorming on. The way I see it, I need to pay a couple of manly men to come dig me some holes with a two man auger. Or maybe my husband can be talked into getting a friend of his to help. I live on a bluff, which means there's lots and lots of rock everywhere I dig. I get so tired of it. If it weren't for that da*n rock I'd have a beautiful yard by now.
IMG_0241

Here is a painted peice of board left over from when we tore down the white wood above our cabinets. I painted it with paint that was supposed to make it magnetic. I had great idea for turning old frames into gallery for my daughter's artwork throughout the year. I have revised my plan because either the paint doesn't work, you need 13 or so layers of it, or the fact that it was dusty when I bought it should have signaled to me that it was too old. It was about $20 I think!!! Purchased at Lowes.
IMG_0242

This was a Japanese garden of sorts. It looked really good until the little short bamboo took over after 2 years. My husband made me kill it all before it leapt over to the neighbors yard. Then when we had some trees cut down, they had to break our gate (which I built mostly-my husband taught me how to set the poles in concrete) and apparently knocked over the landscaping timber. You can also see where cute little neighbor kid broke our hammock and now the frame lays there in my broken dream of always having a Japanese Garden. I am slowly moving some of this rock to a new garden I built acorss the stream. I'll have to take a pic of it sometime soon.
IMG_0239

Well, there are actually more projects believe it or not. But, I'll leave that for another time.

Wishing you success in all your home improvement ventures,
Michele