Choosing Blades
Hello there! When cutting the stiles (front frames of a cabinet) you need to be able to cut pretty straight. I was able to cut one using a borrowed table saw, but we returned it and are now left with a circular saw. Mr. Buzzkill went down to the garage with one of our cabinets that needed a stile cut. I was upstairs with our sweet toddler, Ella. We heard alot of noise and smelled some burning wood. After much clamoring and what I guessed was muffled cursing coming from the basement, Mr. BK came up and showed me a cut stile. It was brown and burned on the end which is ok since it will be against a wall anyway- plus we are painting. But he announced the cutting of stiles with circular saw just wasn't working. Agghhhh! If it isn't one thing, it's another it seems. Neither of knew what to do, so I emailed our nice sales support guy who is part owner of thecabinetjoint.com where I purchased our RTA cabinets. He suggested that my husband may have been trying to use a crosscut blade instead of a ripping blade. Ripping blades cut with the grain of the wood. I also researched hard maple which is what our cabinets are made of and found it we were dealing with one of the most difficult species of wood to cut because it's really hard wood. Who knew there was such a difference in blades? Not I or Mr. BK. You learn something new everyday. I also learned we needed a carbide tipped blade to cut this hardwood.
Next day I ran to Lowes and stared at the dozens of blades. They paged the one knowledgeable woodworker. I showed him how there were ripping blades with a few teeth and then finishing blades with more teeth. He suggested I use a finishing blade (but it did not say it was for ripping). Well, knowing our luck, I just purchased both.
I was debating on which package to open so I could return the unused one. I called an uncle of mine who wood works and he said open the one with fewer teeth. The regular blades are called framing blades. They are round and they go in the saw. Mr. BK kept repeatedly asking me if I was sure I knew what I was doing. I figured we know about the same amount so what would it hurt to let me do it. He wasn't very happy when I asked him to take my picture for my blog which is thinks is a waste of my time (sigh).
So here is me in front yard successfully ripping through the stiles like they were butter! Ha. Can you spot what is wrong with this picture? I've put red Xs to give you a hint.
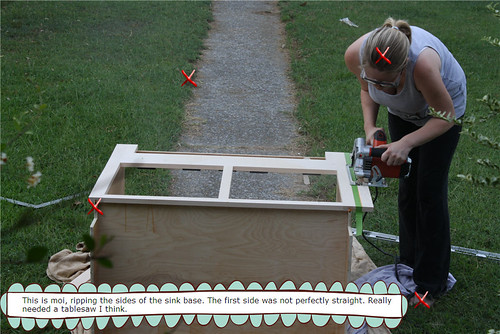
- No shoes. Shame on me. I did wear goggles though.
- I really need to get my roots done as you can see.
- There is excess glue that did not get wiped off cabinet which will need to be scraped with razor blade now bc it's blocking the feet that are to go under the sink.
- My edging job with the blade of weed eater turned 90 degrees did not really go so well as you can see. Ahhhhhh me. I want an edger so bad.
Dry Fitting Sink Base
Next, I moved the sink back into the house and it was time to use the hole cutter that attaches to the end of the electric drill. We had our plumber move our pipes to the wall and we needed to drill holes for the pipes to slip through. Mr. BK looked skeptical. He asked me if I was going to be able to measure and make the holes where they needed to be. The more he doubted I could do it, the more determined I became. I am woman hear me roar! I was thinking of the two major things he has done wrong to our precious cabinets that can luckily be fixed with wood putty since we are painting them. I will refrain from describing and posting pictures of these mistakes online because I'm trying to be nice about it. Needless to say, be prepared to go to counseling with your partner after a diy kitchen remodel!!
I explained to him that I was planning on coating the ends of each pipe with lipstick and bumping up cabinet next to them so I would have neat little round lipstick holes showing me where to drill. You can imagine any man's reaction to that plan.
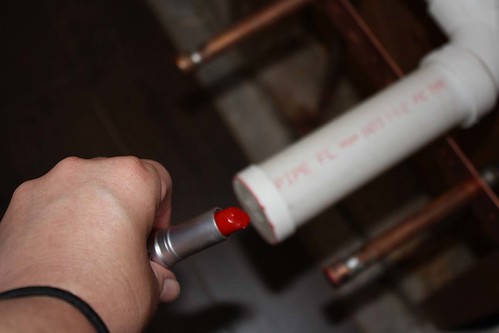

But IT WORKED!!!! In fact it worked so well, that I could not pull the cabinet forward again once the pipes were in bc one pipe was really snugly fit and the copper cap was causing it not to be able to be dethreaded back out out so that I could sand the edges of stiles to neaten up my slightly crooked cut. However, I learned two things:
- Wipe off lipstick carefully after the pipes are threaded through the holes. I and Mr. BK got it on our hands and the cabinet. Oopsy (smile).
- Drill a small hole with regular bit through the lipstick ring and then drill large hole from front side of cabinet so the splintered wood is on the backside.
Then it happened...I noticed the entire cabinet was higher than all the rest of the ones that had already been installed next to them by my husband. I gave up and refrained from crying. Mr. BK (hands covered with red lipstick) was none to happy either. Luckily he spent the next day undoing all his hard work and shimming up the cabinets that were installed so that they aligned with the sinkbase. I made the slight mistake of letting him see me put the 4 foot level over the run of cabinets to just check for myself. Not a good idea. Another reason we will be going to therapy after this is done. Don't worry, we will weather this storm!!!
I may even consider changing Mr. BK's nickname on the blog soon. As I called him at work to ask about something concerning a project and he didn't make one attempt to discourage me. I'm seriously thinking he might be starting to trust me a bit more when it comes to this stuff. I hope so.


No comments:
Post a Comment