Well, like a bolt of lightening, I thought of an idea and I googled it. Battery operated sconces- I'd buy one. Did they exist. Hmmmmm....yes they did. I didn't love the limited designs nor the price tag. I saw some in the 90 dollar range. Then, a idea formed in my head. And while shopping at both the grocery store and Lowes I saw exactly what I needed:
Well, while in the grocery store (Publix) of all places I bought a flexible LED battery operated light for 2.99. Not sure they had it priced right? I only saw one and had to ask them what the price was. I see more expensive items that are similar on the Internet. But, it's not really integral to the project bc the light gives off too much of a blue glow anyway. I'll have to purchase a small battery operated tea light or puck light for undercabinet task lighting.
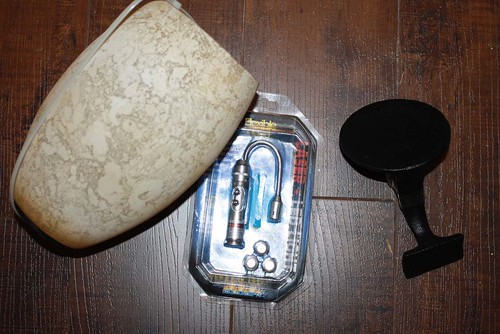
While in Lowes, I saw a black iron doololly (not a technical word) that could screw into the wall and hold my choice of decorative glass sconce shade. The iron thing cost about 3 bucks or so. I quickly walked around until I saw a reasonably priced pendant light shade. It just so happens they had one on sale. This cost me 5.99. I think it'll look nice in my diningroom. Wish I bought two. I hope they have another.
The idea was so simple -especially since the led light I bought had a magnetic bottom. I would glue the sconce onto the metal thing and then the magnetic led light would easily stick to the metal holder inside the sconce. Yippee! Finally something is working out!! Typically all projects for me have some snag.....I forgot this momentarily. (In pic below you can see my kitchen floor is dirty. That is because we are in constant renovation mode. Please pretend you dont' see that dirt!)
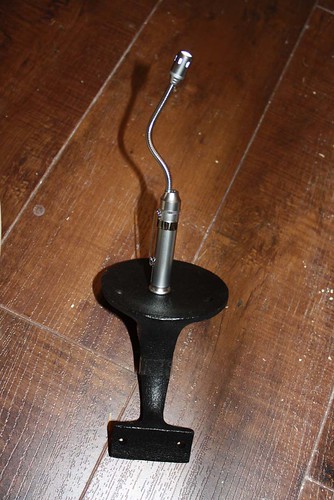
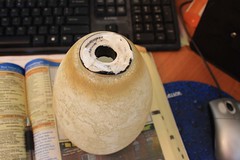
Ugh....first in the excitement of it all, I put only half the material for JB Weld on the sconce bottom. I waited and waited. The next day nothing had dried. Not being able to find the rest of the contents I am supposed to mix together I had to wash this gunk off. It didn't come off the rubbery thing on bottom of sconce so I took tin snips (I think) and managed to crack the plastic and cut through the rubber collar on bottom, sliding it all out and leaving me with just the glass part. Good, that is what I had wanted anyway.
Next, and this was the hardest part of le'project, I had to find some glue that would still come out of it's tube. Tried to work caulking gun to use silicone to no avail. After trying about 5 options-digging long nails and metal rods through the dried up gunk on the lid I finally had my mosaic craft glue which sticks to about anything come through for me. It also dries clear which is nice.
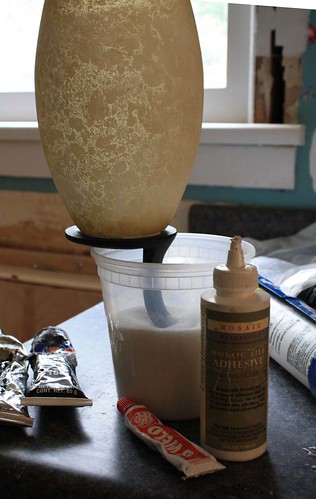
Here is a tip. If you don't want to hold something that needs to balance while glue is drying, use beans, rice, sugar or whatever you have on hand to help balance the item. Here you see my new sconce (pretty pretty) balancing in a plastic container of sugar. I'm waiting on her to dry.
The bad news is the LED is to blue and not strong enough. I'll either use a candle or battery operated light bulb or tealight. Once I find out and once I decide where to mount this baby, I'll holler back at you.
Email me if you too make a sconce similar to this one. I'd love to see it and I'll show to everyone else on the blog if you like.
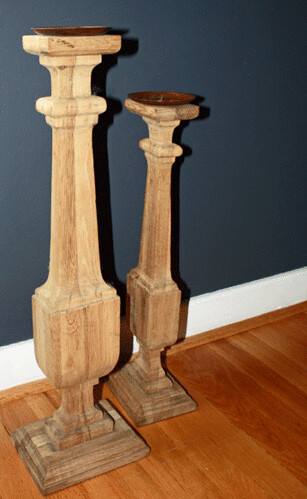
Soon to come, I'll be making this baby into a lamp. It's long and skinny so I'm nervous to drill a long straight hole through it. I know I'd end up driving the bit out of the side. I can either cut it up into peices and drill myself, take it to the lighting place and let them assess whether or not they think they can do it, or I have some names of people a local woodcraft specialty shop suggested I call. They might be able to use a lathe or some kind of turning tool to get a straight hole in it. I'll keep you posted on this one. I'm going to of course start with the long one bc that is just the size I want. It's 24 1/2 " tall. I waited over 5 hours at a going out of business sale where I bought these babies for 80 percent off. Then it dawned on me that my house is really too small for these to work. If only I had a fireplace I might put these to one side of it? But, I do not. I am gonig to have to make lamps.


2 comments:
That's a neat idea for a DIY sconce. Oooh, using rice to balance items is a great tip. Hmmm... I'd love to make a sconce for my daughter's room. This post is very inspiring!
Post a Comment