
Toddler sleeping and if I tiptoe to bedroom to retrieve my camera, sure enough she'll wake up. So, what have I been up to these days? Posts to come on the following:
-Working on turning old ugly rocks into pretty ones to surround toddler's sandbox. Gel stained some yesterday. Thinking of better idea that is less dangerous to environment and my child.
-Putting together gallery for Ella's works of art! In process I learned how to crush beer caps and that magnets stick to them. Don't trust the magnetic paint solds at Lowes if it's dusty and old.
-Cutting mirror with glass cutter may be harder than I thought. Tried it out yesterday and broke large piece. Agghhh!
-New GE Appliances arrived. Yay!! Wow, ceramic cooktop instructions make me think it'll be alot more upkeep than I ever realized.
-Electrician gave us pleasing quote and we don't have to switch from fuse box to breaker box. Good news! Meanwhile, we are in danger of a fire. I sleep on the couch alot just in case.
-Need carbide ripping tip for circular saw if you want to cut through hard maple- which is one of the hardest North American species of wood to deal with. Wouldn't you know that is what our cabinets are made of. Yes, I know, I shouldn't end my sentences in prepositions. But I'm in a hurry bc my child could awaken at any moment.
-The kitchen is much safer now so Ella is able to follow me in there which has helped us avoid alot of tantrums with her pulling on the baby gate. We are also practicing going down our four stairs from upper to lower level.
More to come. Just wanted to drop a line or two to keep my 19 visitors and two followers updated. LOL.
Friday, July 30, 2010
Tuesday, July 20, 2010
Kitchen Update: The First Cabinet...I Could Wait No Longer!
We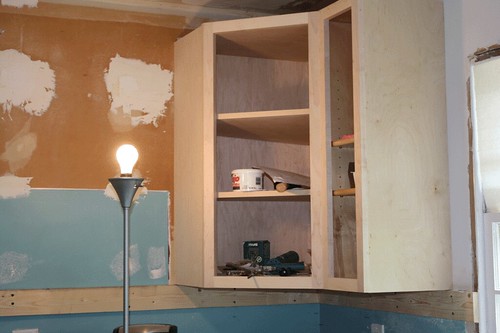 ll, after waiting and waiting and waiting and waiting while Mr. Buzzkill (heretofore I shall be calling him BK bc I'm tired of spelling it out) sanded and sanded and mudded and sanded some more, I could stand it no longer. A couple days after his return to work I did exactly what he said not to do. I asked dude who sold us cabinets if I we should attach all of our wall cabinets together on the floor and raise them up as one, or should we begin with the corner one. He said to begin with the corner one. BK wanted to do the other thing where we hook them all together first. BK had already installed 2x4s along the wall for the back of the wall cabs to rest on. His plan was for me to hold the front while he drilled in screws all along the back of our precious cabs. Well, after R-E-A-D-I-N-G (as you know if you one of my at this time seven visitors) Mr. BK does not believe in reading. Anyhow, after reading about how we should install our Conestoga Wood cabs with beautiful plywood sides and finished maple insides I found out we only needed to screw in the cabs on the top and bottom cleats. These are hidden, unless you were to squat down and really look under the cabinet. I guess some short kids that visit might see them. Oh well. Anyhew, then you are to use a skinny screw and predrill holes to screw the stiles together all along the front. Thank goodness I read this or I'd have screws all along the backs of our cabinets.
ll, after waiting and waiting and waiting and waiting while Mr. Buzzkill (heretofore I shall be calling him BK bc I'm tired of spelling it out) sanded and sanded and mudded and sanded some more, I could stand it no longer. A couple days after his return to work I did exactly what he said not to do. I asked dude who sold us cabinets if I we should attach all of our wall cabinets together on the floor and raise them up as one, or should we begin with the corner one. He said to begin with the corner one. BK wanted to do the other thing where we hook them all together first. BK had already installed 2x4s along the wall for the back of the wall cabs to rest on. His plan was for me to hold the front while he drilled in screws all along the back of our precious cabs. Well, after R-E-A-D-I-N-G (as you know if you one of my at this time seven visitors) Mr. BK does not believe in reading. Anyhow, after reading about how we should install our Conestoga Wood cabs with beautiful plywood sides and finished maple insides I found out we only needed to screw in the cabs on the top and bottom cleats. These are hidden, unless you were to squat down and really look under the cabinet. I guess some short kids that visit might see them. Oh well. Anyhew, then you are to use a skinny screw and predrill holes to screw the stiles together all along the front. Thank goodness I read this or I'd have screws all along the backs of our cabinets. Well, I did it. Whenever I am told I can't do something (which seems like alot lately) I am all the more determined to do it. Case in point, I mowed the entire backyard. Mr. BK actually admitted he was surprised and impressed that day. Then our lawn mower broke a few mows after that and turned into a push mower. I at that time announced I would no longer be mowing. Back to the story....I was supposed to be working and earning money, but instead I used a tall table, some books, bricks, and some flipped over pieces of spare floor with soft foam on the back to balance the one angled corner cabinet that will have glass in the front.
Following the instructions I had gathered from some quick Internet research, I nailed in some long finish nails to ensure I knew where studs were. I do not really trust our studfinder. It has a mind of its own. Then I screwed that sucker in and checked it for level with our 4 foot level. FYI, using anything shorter won't really give you a true reading. I had to convince Mr. BK to buy a 4 foot level. He wasn't going to do it, but I added it to the list of required materials sent from thecabinetjoint.com and made it look like they had put it there. LOL. It worked.
In the image you see my husband added another cabinet to the right side of the angular one. I really should have shot the picture of mine balancing on my tower of books. One reason I went ahead and installed it was because the cab to the left of the corner one has an extra wide stile that needs trimming. I knew we would have to return my brother's table saw soon so I wanted to use it while I could to trim the stile of perfectly straight.
Monday, July 19, 2010
Kitchen Update: The Wall Is Gone!
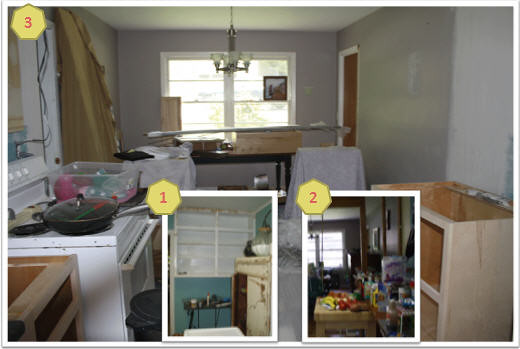
Step One: Used my womanly wiles to talk husband into removing cabinet and tearing down sheetrock so I could envision the two rooms as one space.
Step Two: Building inspector let me know we should have pulled permit for step one. Oops. Had neat joist to hang my daughter's swing from for a while that allowed me to do some cooking.
Step Two and Half: Wait for a very loooooooooooong time while husband sheetrocks. He had tried to hire someone but I begged him to let us do it ourselves. I finally got tired of waiting and insisted I get to try. I bought hot mud that dries quickly and didn't really do any better. Shame on me. I should of listened to Mr. Buzzkill! I decided playing with and taking care of our toddler was much easier.
Step 3: Hire professional to put finishing touches on the sheetrock and stand back in awe of how easily he does it. Wowy! Does the room look huge! I is so very excited!!!!! Yippee.
Sunday, July 18, 2010
Kitchen Update: The Day the Cabinets Arrived
Since I've been working like a dog and am catching you up on all our kitchen update stories, my prose is in past-tense, sorry. The day the cabinets arrived was a happy day...but a crazy one too. That same day Mr. Buzzkill (who was NOT a buzzkill that day) said we should go ahead and buy the flooring since we had just been paid. BAM...I was off like a shot buying those suckers and begging the manager to let my husband pick up the 46 boxes later that day. Manager was adamant we had to get them THAT day. I was terrified someone else would decide to do their flooring in the same stuff and we would not have enough. Well, I made it. Yay! Then , ring ring, it was Fed Ex or UPS? calling to tell me they were arriving with my cabinets! OMG, they were a day or two earlier than I was told. I was also told we couldn't keep them in the basement for any length of time because of the moisture. Suddenly we had no walking room in our house and we were all very tired. Luckily my teenage nephews agreed to come over and help us move the cabinets upstairs and my brother arrived (I forgot he was staying with us overnight to attend a convention in town) to book it down to Sam's and get the floor.
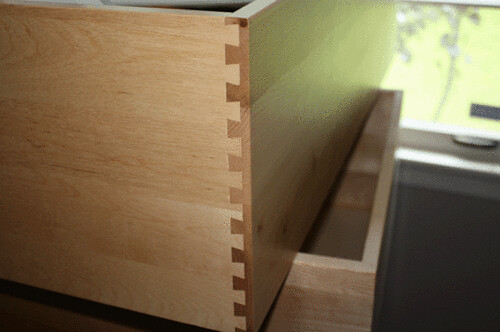
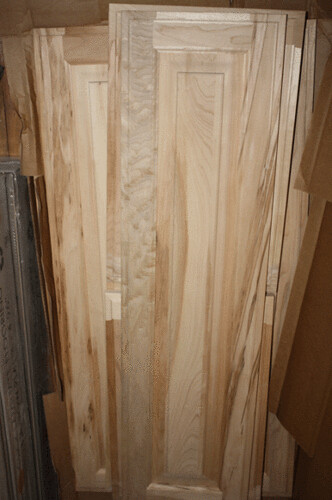
The cabinets ARE beautiful. Because we are going to paint them ourselves the price dropped like a rock. They were under 5K and have plywood on all sides, dovetailed drawers, Blum hardware, finished maple insides, gorgeous detailing on the outside, and we got tons of Rev A Shelf add-ons. I was and still am in awe. Putting them together (except for the lazy susan) has been a breeze. We have everything together except for the pantry at this point. We also have not installed a drawer, the doors, or any rev a shelf equipment. I have to say I've been very impressed with the service thecabinetjoint has provided. I have pestered one of the owners to death with questions and I am really a small time sale compared to others who order from them. He has been timely and polite with all of his responses. Also when we had a piece missing, he had another sent to us immediately. When we had one piece that was cracked, BAM, he sent another no questions asked. I get the keep the cracked piece. I am planning on repairing it with woodfiller and using it as a mirror frame I think.
I am planning to prime these beautiful cabinets with PrimeLock from Benj Moore, paint them with Muralo Paint from Benjamin Moore using a Wagoner Sprayer, and then I'll lightly add some pewter/gray colored glaze. Fingers crossed all this works!
Saturday, July 17, 2010
Kitchen Makeover in Progress: Flooring
Hi All,
 Redoing my kitchen has been exhausting to say the least! Word to the wise, prepare your walls before your cabinets arrive. My husband kept saying he did not want to jump the gun and would do everything during his vacation. NOT! Here we are a month later still not even 1/2 done.
 For the home test, we bought 2 boxes and assembled a hunkof floor in the kitchen. I invited my dog to play on it, I smashed banana into it, dropped random things (more detail in link to my review), and I stomped on it in some of my highest heels. (I won't even tell you what Mr. Buzzkill suggested we do on it!) Not a scuff...until I dropped a can opener from waist high...but we decided that would dent any floor and that we would be especially careful not to drop can openers on the floor. I was also able to disguise that particular dent extremely well using a stain marker I already had around the house.
For more in depth information, you can see my review of it at this link: http://hubpages.com/hub/Golden-Select-Laminate-Flooring-Review. For the price, it is an unbelievably attractive flooring option. I know it sounds hideous being this cheap and from Sams, but it is awesome! I also have pictures of it at the above link. We have 1/2 the floor down in the kitchen as well as all of it down in the living room and it has performed beautifully thus far. Why just this morning, my Great Dane who is developing a fear of thunder came inside while it was storming. I put her in the back of the house because my daughter was eating. I didn't want her slobbering and begging for food. Ella also loves to throw her food as well. Suddenly Abbey jumped over the baby blocker (it's a homemade huge thing I made from 2 x 4s bc I could not find a gate with a right angle) and landed on the floor. I was sure a huge jump like that probably made dents or scratches of some kind. I quickly ran over to inspect and not a thing -except of course dirt and dust. I swear I am having a hard time keep the floor clean with all this construction going on in my kitchen. Plus, my dishwasher broke and I am not always putting my daughter in the highchair to eat. Shame on me. This is part of the reason the floor is looking dirty. I have been dust mopping, though, not every day. I plan to be all domesticated and enjoy my routine cleaning after this dam* kitchen is installed.
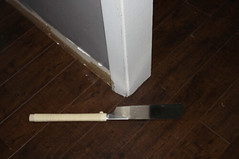 One more tip...as I may have said before, my husband doesn't like to R-E-A-D directions. After seeing the last cabinet install and how he put in the engineered wood flooring (before I knew him) I have been keeping a close eye on him. Hopefully, he won't ever read this blog. I guess since he doesn't read much besides financial news and play solitaire on the PC I don't have to be too worried. Anyhew....I do read adn I discovered that one should use a Japanese Handsaw to inexpensively cut the baseboard when you want your flooring to go under it. Did our previous flooring go under the baseboard? I think you can probably guess the answer to that one. NO! Well, I asked Mr. BK what saw we were going to use to cut the baseboard and he showed me. In retrospect it might have done the job...but I hightailed it to the Woodcraft store and bought myself a Japanese Woodsaw which I have read about alot in other woodworking books. It was about 25 dollars or so. It is really sharp and is used for making smooth cuts. It is also cool because it cuts on the backward pull instead of when you slide the saw forward like an American one. I'm stronger pulling back than I am pushing forward so I love this thing. Mr. BK and our friend we enlisted to help put down flooring with us for a few hours also grew to love it. You do have to watch that you don't saw into a nail though. I keep grabbing it up and doing Mr. Miagi moves with it while saying things like, "Ewwwwwaaaaachi WA!" and kicking my legs out alot. Mr. BK gets annoyed and also nervous I'm going to hurt myself when I do this.
 Redoing my kitchen has been exhausting to say the least! Word to the wise, prepare your walls before your cabinets arrive. My husband kept saying he did not want to jump the gun and would do everything during his vacation. NOT! Here we are a month later still not even 1/2 done.
Sorry... I haven't written in so long because I'm constantly working on the kitchen, playing with my toddler who is whining constantly at this stage of her life, or checking on my mother. She has dementia and just turned 65 so I had to learn waaaaaaayyyy too much about Medicare!
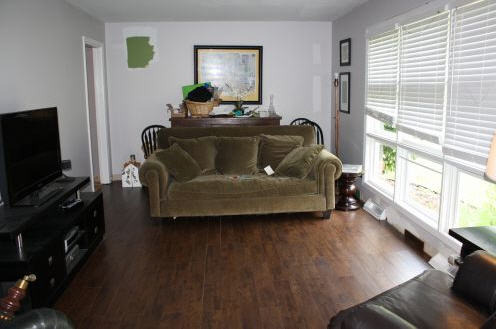
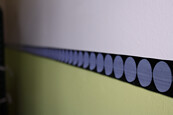
One of our first projects involved pulling up the nasty nasty berber carpet in our living room. I found a steal of a deal on some laminate flooring! We decided on laminate because it is hard to scratch and we have a Great Dane and Ella, our toddler. After weeks of begging and trying to convince Mr. Buzzkill that laminate was the way to go if we wanted to also be able to afford nice counters and appliances, he finally agreed to it. The search was on!!!! You won't believe me...but the floor we bought and is shown in the image above is about 76 cents/ sq ft and has foam backing already attached. It's super thick and has a 25 year warranty. I bought 48 boxes of it at Sam's Wholesale after Mr. Buzzkill read the reviews, looked at the stuff in person, and it passed our home test. There we were in Sam's clicking together a large hunk of floor to see if it looked realistic. I was thrilled when my husband actually thought it was pretty nice looking. The image above doesn't do it justice. Please ignore the painted splotch of green on far wall...I'm deep into the depths of color testing. This color is Martha S's Bay Leaf Green. Mr. Buzzkill gave it the thumbs down and said it looked like vomit. Agghhhh! I agree it is not good for an accent wall behind the couch...but I could see it in our kitchen. However, I think I've found something even better. I'll fill you in no another posting.
 For the home test, we bought 2 boxes and assembled a hunkof floor in the kitchen. I invited my dog to play on it, I smashed banana into it, dropped random things (more detail in link to my review), and I stomped on it in some of my highest heels. (I won't even tell you what Mr. Buzzkill suggested we do on it!) Not a scuff...until I dropped a can opener from waist high...but we decided that would dent any floor and that we would be especially careful not to drop can openers on the floor. I was also able to disguise that particular dent extremely well using a stain marker I already had around the house. One more tip...as I may have said before, my husband doesn't like to R-E-A-D directions. After seeing the last cabinet install and how he put in the engineered wood flooring (before I knew him) I have been keeping a close eye on him. Hopefully, he won't ever read this blog. I guess since he doesn't read much besides financial news and play solitaire on the PC I don't have to be too worried. Anyhew....I do read adn I discovered that one should use a Japanese Handsaw to inexpensively cut the baseboard when you want your flooring to go under it. Did our previous flooring go under the baseboard? I think you can probably guess the answer to that one. NO! Well, I asked Mr. BK what saw we were going to use to cut the baseboard and he showed me. In retrospect it might have done the job...but I hightailed it to the Woodcraft store and bought myself a Japanese Woodsaw which I have read about alot in other woodworking books. It was about 25 dollars or so. It is really sharp and is used for making smooth cuts. It is also cool because it cuts on the backward pull instead of when you slide the saw forward like an American one. I'm stronger pulling back than I am pushing forward so I love this thing. Mr. BK and our friend we enlisted to help put down flooring with us for a few hours also grew to love it. You do have to watch that you don't saw into a nail though. I keep grabbing it up and doing Mr. Miagi moves with it while saying things like, "Ewwwwwaaaaachi WA!" and kicking my legs out alot. Mr. BK gets annoyed and also nervous I'm going to hurt myself when I do this.
Thursday, July 1, 2010
My Daughter's Nursery- Cute and on a Budget
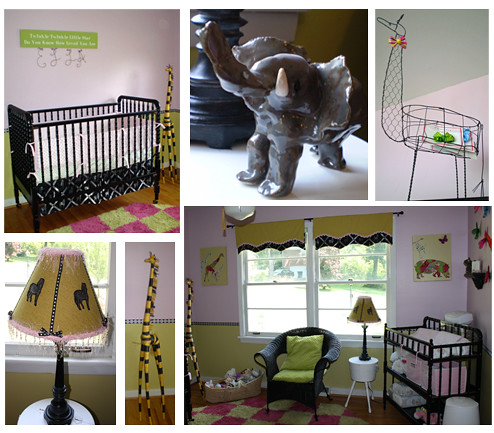
I wanted an adorable, unique nursery for my little girl that featured a jungle animal theme. Having little money, I had to use my creativity to make my dream come true. Searching endlessly for a jungle theme using feminine colors led me to believe there was nothing out there. At least nothing that matched the black furniture we were using for her room. At the time I was pregnant there were few bedding sets that had a little black in them. I’ve seen more since this time. I found a gorgeous black armoire significantly discounted because of one scratch. I then bought a black baby bed to match. We found the typical looking diaper changing table for sale on Craigslist for 20 bucks. It was wood in color, so my husband sprayed painted it black. He didn’t prime it though so I see some of high gloss spray paint used is now chipping off on one corner. I chose this type of changing table because I knew it could double as a book shelf and holder for toys as she outgrew the need for a changing table.
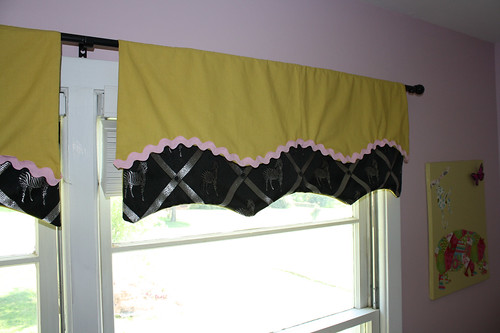
I’m not a terrific sewer, but something about knowing it was for my child, brought out the best in me. I was determined to find the materials I needed to decorate the room and sew my own bed skirt and window toppers. I’m happy to say it turned out great, in my humble opinion. My mother and I went to the material store. She has dementia, but can still get out and do a few things. She found a gorgeous luxurious fabric in the upholstery section featuring a silver and black diamond design with a zebra in each diamond. I had to have it though it was pricey. Luckily when I went back to buy some more of it because I ran out, it went on deep discount and I got it for a steal. You can see how I used it in the curtains in the picture above.
I bought a pattern for making crib skirts so that I didn’t have to measure out perfect squares. Wish I had known I’d be creating a blog so I would have taken pictures along the way. A bedskirt is simple. You just buy some cheap muslin fabric for the part under the mattress that isn’t seen. Basically you cut rectangles out for the middle white part and the sides. Then do a simple rolled hem around the front, back and side panels that will be attached to the muslin. I didn’t follow the pattern completely because I wanted some pleats on the front and back bedskirts. I just increased the size of my front and back panels by a few inches and pinned in a pleat. I sewed all the panels to the muslin square and voila I was done.
I decided to buy pink and green bedding and bumper for the bedding. It looked so cute. Later I cut out squares of corresponding patterns to make the comforter, but I never assembled them all. Had little Ella before I could get it done. I was given so many blankets it didn’t matter, plus I had heard a newborn doesn’t use the comforter anyway. I chose a green dotted sheet and a pink bumper. I also purchased a less expensive pink sheet as well. It all looked great together.
Using the bedding colors, I found two paints that I felt matched perfectly. Mr. Buzzkill (who wasn’t really a Buzzkill at anytime during this particular project) painted the top part of the room pink and the bottom green. Wish I had known about frog tape back then. I could have created a perfect line between the two colors and hand painted in a different color. I considered a chair rail, but then I saw the most perfect ribbon. It was black with silver polka dots. Having read about gluing a ribbon onto the wall as a chair rail some time ago, I decided to give it a whirl. I used a very light bit of Aileens tacky glue and a laser level to ensure it was perfectly straight. I glued it on over the space where the two different colors stopped. It has held up great with no problems whatsoever. I even saw where my daughter had started picking at it through her crib rails and it didn't loose. Now as she get's stronger I may have to pull the crib out some. Everyone who has visited the nursery keeps thinking I painted the ribbon chair rail with a stencil or by hand. The color of the ribbon tied in the with the zebra bed skirt perfectly.

Feeling more confident in my sewing abilities, I bought a pattern for simple curtain toppers/swags. I had bought a green fabric with a little bit of black thread running through the weave on deep discount way back before sewing the bedskirt. I decided to incorporate it into the window toppers along with zebra fabric. You’ll see that it looks pretty cute, despite the fact that I’m not a great sewer and I ran out of fabric. I now have a secret spot to hide jewelry or other goods when we go on vacation –if ever! (See in image above). I really need one. I wasn’t sure about my ability to sew rod pockets so I just threw the toppers over the black pole and they hang perfectly.
I needed some nursery art. I’d bought a little wooden sign over her bed along with the letters of her name made out of wire covered with pearls. This was a splurge at around $15 each. I was glad I named her Ella and not some long name like Charlotte (smiling).

Next , I looked through my scraps of material and decided to make jungle animal silouhettes out of them. I primed and painted over two ugly paintings I had from a painting class I had attended for fun. I ironed some backing onto the materials I wanted to use to give it some stiffness. Looking on the internet I found some silhouettes of animals I liked. I blew them up to different sizes and printed them off. I had to tape them together, as some were too big for the printer. I traced the images onto the fabric and cut them out. I then ironed the cutouts onto the painted canvases. However, I’ve had to since glue them on because the interfacing didn’t hold well.

I also used some of Martha Stewart’s cookie cutters I had been given as a gift years ago to cut out shapes in porcelain clay. I happened to be taking a clay class for fun. I rolled on various lacey textures and glued them to canvases with tulle bows attached to the top. If you don’t have access to real clay that is fired, you could probably make these out of salt dough, paint them white and spray them with a gloss preservative. You could even die the dough if you wanted colors. Also you could use frog tape to paint stripes on the canvases to which you are adhering your art work.

I created a zebra lamp by cutting out the zebras from the fabric and gluing them onto the shade I had made. I used a adhesive shade from Hobby Lobby which comes with a template for cutting out your base material you use to cover the shade. I added some fruffy ribbon and voila it was ready for the black lamp base I already owned. You can see I ran out of ribbon on the back, but we were too poor at this time for me to buy some more. Basically living off one income at this time. My contracting work had slowed to a snail’s pace.

Oh lucky day thought I when I saw Jerry Giraffe just waiting there at Anthropologie (on sale for $17) for me to buy him and take him home. Then with the addition of a few extras, like a cute clay elephant my mother made for Ella in clay class and a large zebra coffee cup for flowers, I was set. Oh, and I found a super discounted rug that pulled the whole room together. Still cost me a pretty penny, but the store told me it would have cost over a thousand on special order. The person who ordered it didn’t want it. I got it home and it felt a bit lumpy where the squares of carpet had been attached. But, you know, the more we have walked on it, the less lumpy it feels. I barely feel any these days.
Last but not least, I had my husband spray paint an old rattan chair I bought from Pottery Barn in my single days. I bought cushions to match. It wasn’t all that comfortable and I can’t rocker her in it, but realistically we always ended up in the living room watching tv and rocking her there.
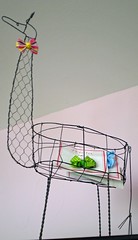
I almost forgot…this is Mrs. Bowregard. I tell Ella she has a high regard for bows. I could not believe my good fortune when I saw this little cutey for $8 in a gallery of artists. There were only a few bows at first, but now she is littered with bows from top to bottom and Ella loves choosing one each morning.
My only regret (or so I thought) was not having time to paint the ugly ceiling fan white. However, it turns out babies are mesmorized by ceiling fans. I wrote an article about it, in fact. You can see that here. I was glad the ceiling fan stayed ugly brown when she was little because it helped it show up better against the ceiling for her little eyes.
Subscribe to:
Posts (Atom)


