Friday, August 27, 2010

Repurposed Candlesticks

IMG_0907aAhhhh....I remember the day about 4 years ago when a floofy doo store was going out of biz. They had zillions of cool items that were usually out of my price range. I did get my husband to buy me wall candle holder thingy I'll show you one day- at full price. I love it, but it's probably too big for my home.

Please ignore ugly shade it's currently wearing. No time to shop at the moment.

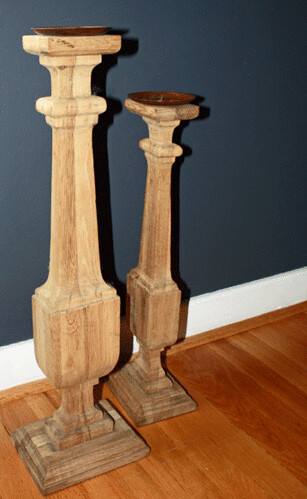
Anyhew....when I heard they were going out of business, I zipped across town to the store that already had throngs of bargain goers there. I immediately found the wooden candlesticks I had been lusting after for about a year. However, I couldnt' afford them. BUT at eighty and ninety percent off, I certainly could now. I want to say the 24.5 inch one cost around 125 dollars? I two of them up and was about to get the third when a lady grabbed it right out from under me and tried to talk me out of the ones I had. No way! Now, I didn't have my cell on me and I had a handful of great deals. The line was tortuously long. I no children at that point, so I felt it was worth it to wait. Turns out the wait lasted 5 hours!!! There were only two registers. I could NOT believe it. But after you invest an hour or so waiting you figure you have to continue at that point. Do you know once I got home I realized that everything I had was actually sconce or candle related. Oddness.

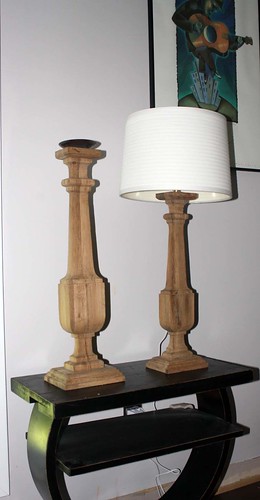
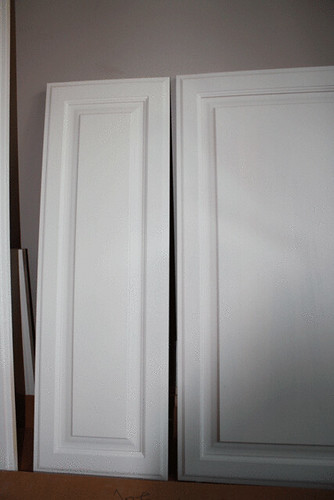
So these gorgeous candlesticks have set around collecting dust for FOREVER bc I don't know where to put them. I have no fireplace. They are too tall to go on top of a peice of furniture.

But the other day, I had an ahha moment. The decorator hadn't even suggested it- I am surprised. I would make these suckers into lamps! Oh the sheer genius of it made me smile for days. Then I got to looking at my lamp kit and thinking about the height of the lamps. Man would I have to drill a long straight hole. I was guessing a 1/2" in diameter would be wide enough of a hole.

I called the fanciest woodshop we have in town and they gave me two names of people who might be able to use a drill press or a lathe. I then checked with a lighting store who said they didn't have any long bits. This surprised me bc they say they can make specialty lamps!? Who does this if they don't have a drill bit longer than 3"?

IMG_0908b
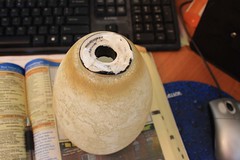
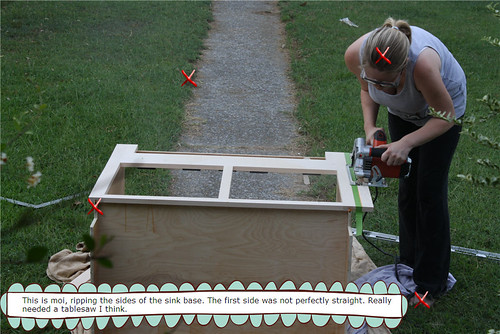
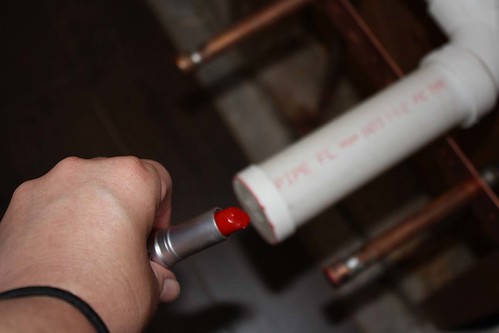
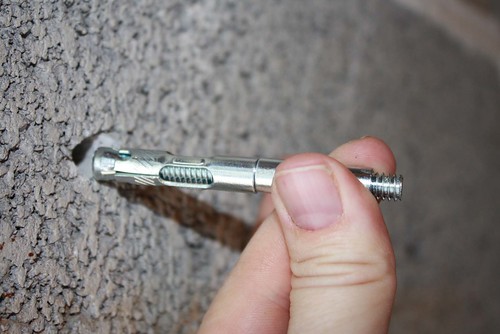
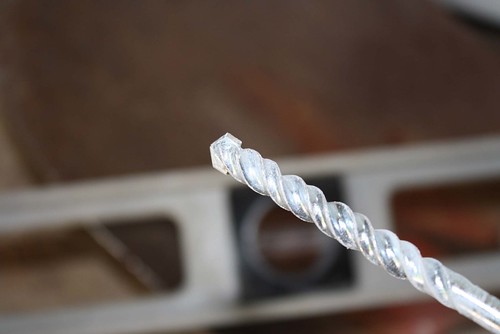
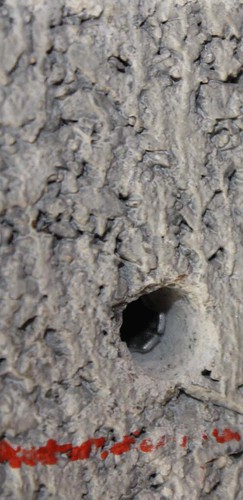
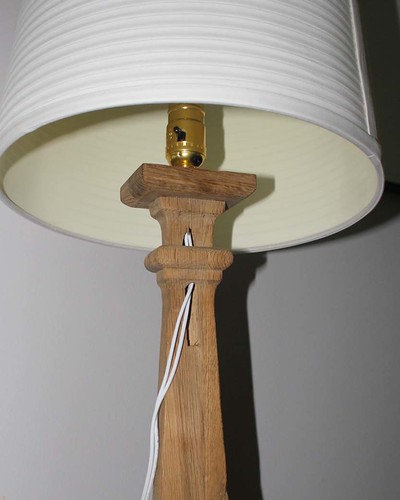
The other day I got impatient and I also didn't want to have to locate teh person I'd be calling up with lathe or drillpress and I wasn't sure how much he'd charge. So with a handful of levels and my new drill I eyeballed it. I was so proud of myself. I actually got past the skinny part of the taper in the candlestick without coming out fo the side. It was about 3/4" by 1". I began with a small bit. Then I tried a 1/2" one. Success! But unfortunately, I did not have a long bit in this size. Not wanting to spend money on one, I decided to just chance it and drill with the 5/8" bit since I did have a long one of those. That is when tragedy struck! My poor lamp. I could have cried. I came out fo the side. You can see the problem here.


It's a good thing I started on the shorter one and still have the other one left. I'm going to try to figure out how to repair this one or at least staple cord down to the side and face that part away from everyone. And, I will call the people the woodstore suggested for the next one. My other option was to cut the sucker in 1/2 or into 1/3s, but something in me just keeps avoiding that.

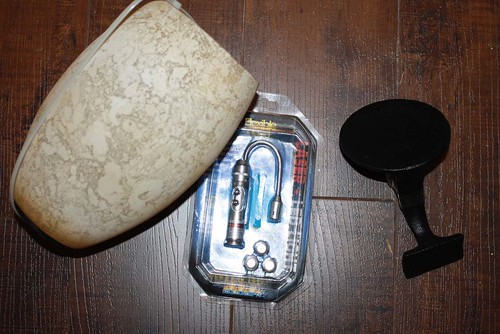
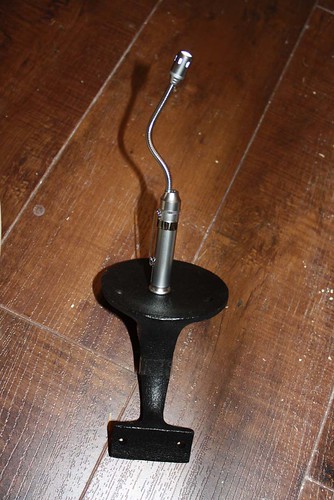
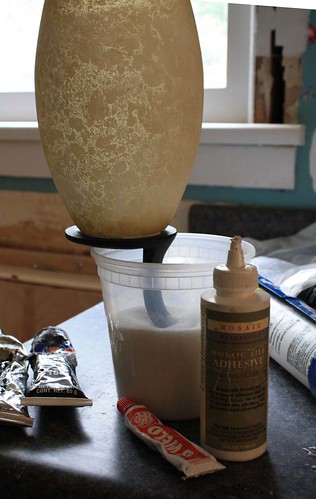
Now, I've never made a lamp before, but I'm here to tell you that once you have a hole in your object, it's pretty simple. The directions on the lamp kit tell you what everything is and what order to put it on in. It did tell me to tie and underwriters knot (hey I think the Girlscout Troop I was in did go over that once, but I was probably eating cookies and talking about boys when that bit of info was passed on). Too bad Mr. BK wasn't there. The man I married is a knot tyer tier, ---of forget it....the man I married knows how to tie some knots! Whenever buy something that he has to secure to the roof of his truck, I can hardly wait to get home. I want give any further detail, except to say if he were smart he'd try to tie more knots in front of me. LOL. Well, after a few minutes of searching I finally found a decent site for showing me how to tie this mysterious knot. Here is the link: click here to go there. It's pretty easy actually.

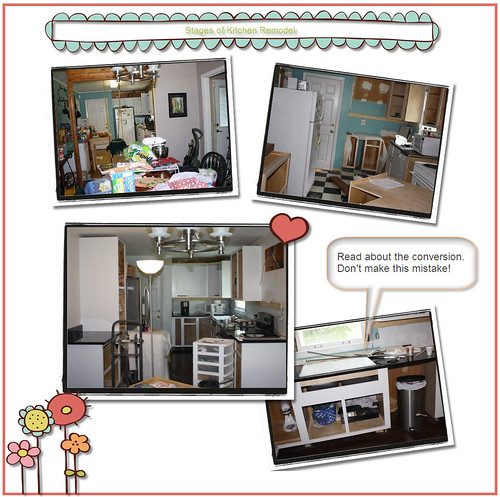
So, I am getting ready for company. Wish me luck as I try to paint a part of my house with my toddler here. It's low VOC or no VOC paint from Benj Moore. Did you know you can use flat in your kitchen and stuff now? Amazing! They made it wipeable. I like flat bc it hides flaws in the walls.

Have a great weekend.

Tuesday, August 24, 2010

We Have Countertops and Partially Painted Cabinets

Oh boy...I am so excited that I'll soon be doing dishes NOT in the tub! Icky and gross.

Countertops were put in yesterday and the absolute black granite looks awesome -except for one spot with white sealer that did not dry clear. I'm sure the company will remedy this, though.

Below we see the progress over the last few months.

kitchenupdate

Learn from my mistake. Farmsinks are really expensive if you want firestone! I wanted a white firestone, so I opted (after an endless search for a 33-36" affordable two hole white firestone farmhouse or apron sink to transform the apron sink cabinet into a regular one. We have a false drawer front and taller cabinet doors we ordered to be put on the cabinet to make it look like a regular drop-in sink cabinet would have. I am wondering if my little tapered legs will still look ok? I hope so. We shall see....

We have been priming our paint grade Maple cabinets with Primelock from Benj. Moore and painting them with Muralo paint. We added a little conditioner in with the Muralo to help disguise any brush marks. Mr. BK has been doing most of the painting. I have only had the disasterous day with the Wagner spraypainter that I do NOT suggest anyone buy! I was using thinned down Primelock in it. I still can't get that primer off my toenails. I've used acetone remover and a file.

Tuesday, August 17, 2010

HomeSweetProgress: My Daughter's Nursery- Cute and on a Budget

HomeSweetProgress: My Daughter's Nursery- Cute and on a Budget

Hi Everyone. If you have a cute nursery re-do, you are encouraged to post your link over at The Lettered Cottage -one of my favorite blogs ever! Here is a link where you can visit everyone's posts and also link yours up as well.

Inexpensive Sconce- 86 the Electrician

For those of you who have ever waited tables, you know "86" means cancel that item on the order. So...I have always wanted a sconce, but have never wanted to pay an electrician to come out and especially wire it up. If I had wads of cash lying around, then sure.

Well, like a bolt of lightening, I thought of an idea and I googled it. Battery operated sconces- I'd buy one. Did they exist. Hmmmmm....yes they did. I didn't love the limited designs nor the price tag. I saw some in the 90 dollar range. Then, a idea formed in my head. And while shopping at both the grocery store and Lowes I saw exactly what I needed:

IMG_0879j

Well, while in the grocery store (Publix) of all places I bought a flexible LED battery operated light for 2.99. Not sure they had it priced right? I only saw one and had to ask them what the price was. I see more expensive items that are similar on the Internet. But, it's not really integral to the project bc the light gives off too much of a blue glow anyway. I'll have to purchase a small battery operated tea light or puck light for undercabinet task lighting.

While in Lowes, I saw a  black iron doololly (not a technical word) that could screw into the wall and hold my choice of decorative glass sconce shade. The iron thing cost about 3 bucks or so. I quickly walked around until I saw a reasonably priced pendant light shade. It just so happens they had one on sale. This cost me 5.99. I think it'll look nice in my diningroom. Wish I bought two. I hope they have another.

The idea was so simple -especially since the led light I bought had a magnetic bottom. I would glue the sconce onto the metal thing and then the magnetic led light would easily stick to the metal holder inside the sconce. Yippee! Finally something is working out!! Typically all projects for me have some snag.....I forgot this momentarily. (In pic below you can see my kitchen floor is dirty. That is because we are in constant renovation mode. Please pretend you dont' see that dirt!)

IMG_0883k

Ugh....first in the excitement of it all, I put only half the material for JB Weld on the sconce bottom. I waited and waited. The next day nothing had dried. Not being able to find the rest of the contents I am supposed to mix together I had to wash this gunk off. It didn't come off the rubbery thing on bottom of sconce so I took tin snips (I think) and managed to crack the plastic and cut through the rubber collar on bottom, sliding it all out and leaving me with just the glass part. Good, that is what I had wanted anyway.

IMG_0884e

Next, and this was the hardest part of le'project, I had to find some glue that would still come out of it's tube. Tried to work caulking gun to use silicone to no avail. After trying about 5 options-digging long nails and metal rods through the dried up gunk on the lid I finally had my mosaic craft glue which sticks to about anything come through for me. It also dries clear which is nice.

IMG_0888a

Here is a tip. If you don't want to hold something that needs to balance while glue is drying, use beans, rice, sugar or whatever you have on hand to help balance the item. Here you see my new sconce (pretty pretty) balancing in a plastic container of sugar. I'm waiting on her to dry.

The bad news is the LED is to blue and not strong enough. I'll either use a candle or battery operated light bulb or tealight. Once I find out and once I decide where to mount this baby, I'll holler back at you.

Email me if you too make a sconce similar to this one. I'd love to see it and I'll show to everyone else on the blog if you like.

Soon to come, I'll be making this baby into a lamp. It's long and skinny so I'm nervous to drill a long straight hole through it. I know I'd end up driving the bit out of the side. I can either cut it up into peices and drill myself, take it to the lighting place and let them assess whether or not they think they can do it, or I have some names of people a local woodcraft specialty shop suggested I call. They might be able to use a lathe or some kind of turning tool to get a straight hole in it. I'll keep you posted on this one.  I'm going to of course start with the long one bc that is just the size I want. It's 24 1/2 " tall. I waited over 5 hours at a going out of business sale where I bought these babies for 80 percent off. Then it dawned on me that my house is really too small for these to work. If only I had a fireplace I might put these to one side of it? But, I do not. I am gonig to have to make lamps.

candlesticks

Thursday, August 12, 2010

PS- Ceiling Paint

I forgot to mention in my last post that THE best ceiling paint ever is an ultra flat matte paint by Benjamin Moore. My husband and I are terrible at ensuring every little nick is smoothed out in the ceiling before painting. I've also noticed our ceilings often show brush strokes. Well, not with this stuff, honey!! I will never use anything else. I absosmurfly LOVE IT. I can't believe I just referred to the smurfs. You may be too young to remember if you are in your twenties.

I know it'll cost more, but I think I'm going to have them tint this stuff or I'll buy more and just poor a little of whatever I'm using for wall color in the ceiling paint and mix it up. It truely hides all kinds of imperfections. No, I am not getting paid to say this (smile). It comes in a yellow can is called ceiling paint.

In addition, the decorator told me that BM (I prob should not abbreviate it this way) also sells matte paint that can be wiped and cleaned just a well as any of the other sheens. Hmmmm..I don't see how this is possible. I'll be doing some research before I paint with it. I do love matte though. However, I have a sticky handed toddler living with me too.

Choosing Wall and Ceiling Colors

Hello There! Happy Thursday.

The Color Scheme - Still Choosing Between the Greens
Today's post concerns paint colors, color schemes, and my upcoming plan. I love color and have been studying up on it and collecting paint chips for months now. But, I'm terrible at it. There, I said it! Our dining room was red when I moved in, I painted it purple, yellow, tried a faux denim panel treatment (don't ask), and finally grabbed a chip of greyish brown and painted livingroom, hallway, foyer, and dining area different shades from the same paint chip. I don't remember the name of the color or which line it came from though. Oh well, I"m tired of it anyway. I love color....but I have to start admitting that I"m not good at choosing it for my home. Or I haven't been up until now (fingers crossed). Mr. BK is colorblind so he's no help. I sometimes wonder what I actually look like to him???

Example of our crazy art!
 I love how the bright green and army greens
are combined, yet it seems scary
to do this in a whole large room.
I hired a Benjamin Moore decorator to come over for two hours and advise me on my home. After she left I was wondering if I'd just wasted some green-- but as time passed her message to me began to resonate. I have a small house with furniture that is too big, so I should choose light colors if my goal is to have an airy, serene, comfortable house. We have vivid tastes in art (shown in image to the right), so it'll POP if I use a softer color on the walls. She kept choosing what I thought were boring colors...but I began to realize I needed to choose colors that blend my surroundings and help create an atmosphere I"m trying to go for which is light and airy and soothing. Sort of how you feel when you go to a beach house but Mr. BK won't let me do beach theme bc we don't live near the coast. I used to...I miss it so. Ms. Decorator told me I should NOT just be choosing dark saturated colors bc I love the color. If I'm dying to do a darker color, she suggested I use it for a smaller area like the bathroom. So..... my original Martha S colorscheme is out. I had chosen colors from her woodsy scheme that has leaves in the corner. 

So, my couch is an olivey army green velvet and she suggested I pick a wall color for that room that was a lighter value/shade/hue (I am not sure which word fits here --you can see how the months of studying really stuck in my brain, can't you?). I'll go with shade. I'm to choose a lighter shade of this olivey green couch's color and use it on the walls. I could even choose an even lighter shade of it for the ceiling. I couldn't tell what the colors she suggested looked like from the Internet, so because SW actually gave me a whole color deck fan thingy, I decided to use their colors as the ones to choose from. I then spied a book that had the tannish green color being used on the cover (see below). It also had some other colors that I liked with it. I decided to match up a gold and blue with the book and match up the green hue to couch. You can see the book here (I blurred out title bc of legal ramificatons if there are any?) Someday if I learn how to do a giveaway I'll have to see who can send me the title of this book- LOL.


On to the renovated kitchen dining combined area.....Ms. Decorator told me my chandy, a birthday gift from two years ago, looked dated? I decided she was wrong. I would love to replace it with a blown glass chandelier or one with crystals and a drumshade around it...but need more mula, mula, mula. (Mr. BK already almost died when I went out and purchased a new drill and weedeater the other day. Don't ask permission, ask forgiveness instead. This philosophy was taught to me by a very successful business woman friend.) I do hate this chandy though for the simple reason that it gives off no light. I'm going to try putting in some brighter bulbs.

I showed the decorator some pics I love of kitchens that use a red and blue color scheme. She thought it'd work fine. Yippee!!! Wanna see pics of my inspiration kitchens? Well....I am scared of getting sued. I am currently asking permission to use them first...but here is where you can go to see them....

Image 1: It's called the Park Avenue dining room and it's designer is Katie Ridder. There is a gorgeous blown glass chandelier that is white and red. The room is painted blue and there are green curtains. This lady really knows how to combine colors!! Until I receive permisson to use her image, you can see the room in a post over at Cococozy's blog here. It's the bottom image. I'm hoping if I use some red in the kitchen it'll be ok and flow alright with the adjacent rooms. I figure red and green go together and since the light green room will be beside the light blue kitchen it'll be ok.

Image 2: I also love the idea of bringing red into the dining area using some red bamboo chairs that I think might be called Chinese Chippendale chairs. Click below to see the image using these. I'm not sure who to ask for permission to post the image and until I get better at understanding what images I can legally use I'll err on the side of caution :) I saw it somewhere and saved it in my house and yard ideas file.

Well, enough about color for now. I have some "real" work to do . TTFN, Michele

Tuesday, August 10, 2010

Sraying Primer on the Cabinets

Hello My Dear Readers-
Might I suggest you rent a very high-end professional paint sprayer if you choose to spray paint your cabinets or other items in your home. I bought a Wagner that I had read favorable reviews on. Funny, how all the reviews were bad at the end of yesterday when I looked it up again.

paintonfeet

Yesterday was a comedy of errors! I couldn't find the paint sprayor, I spilled a can of expensive PrimeLock primer from Benj Moore. I spilled some mineral spirits as well and ran out of them to clean the paint sprayer. I had to rush to the store to buy some more spirits before the oilbased primer dried in the gun and damaged it. Agggh!

After 3 trips to BM and 1 trip to Sherwin Williams, I ended my day covered in primer. My feet up to my ankles were solid white. My toddler looked at me in disgust as I showed her how grass was stuck to the bottom of mommy's foot. As I sprayed primer on the cabinets layed out in driveway ontop of blocks and random peices of wood, I kept dragging the extension cord through some of the cabinet that were already painted. The sprayer frequently "burped" air causing it to spit out drips of paint on what looked like a perfectly sprayed cabinet. I stepped in paint that had spilled on drop clothes, I breathed in fumes, I got paint on my glasses and face and all over my legs and arms.

Mr. BK stayed inside with the child and suggested many times that we should have thought this out better. Ughhhhhh! Procrastination seems to always be his answer. He kept saying if they were up higher we'd have less bugs trying to land on them. Well, maybe so, but I figure bugs can still fly waist high had they been on some sawhorses (which we do not own).

Hopefully things will go better this next round. I plan to either rent a sprayor or handpaint. I'm using Muralo paint from BM which is an excellent self-leveler. I think I bought high-gloss. Below is a picture of a couple of cabs sprayed with primer. When the gun was working correctly, I have to admit it did look really professional.

primed-cabs

I put on socks and shoes, but wore shorts to the store to buy some coffee icecream. People looked at me weird. That is when I noticed I had paint all down the backs of my legs. The bath with a vat of MOJO didn't remove all the paint. The picture of my toes is from today.

Friday, August 6, 2010

Small Things Make Me Happy -A Little Whimsy Here and There

Digging around in that box of crap containing tons of metal things I have no idea about, did pay off the other day. While I was making my shelf attached to our cement wall in basement, I happened upon a cute little piece of metal that Mr. BK told me he thought was a washer when I asked him about it later.

This is a fish I bought years ago at a boutique for about 7 bucks. I don't know where it's final resting place will be yet, but I love it and want to make some of my own in the future. I glued the washer to the fishy to dress him up. Isn't he too cute?

Before (Actually, I remembered to take before shot after I'd already put wood glue around eye- we'll see if this glue works)
IMG_0707h

After
IMG_0708g
The artist signed his piece F. Terry on back. Not sure who he is. Love his idea though.

Ripping versus Crosscutting & Using the Right Lipstick

Choosing Blades

Hello there! When cutting the stiles (front frames of a cabinet) you need to be able to cut pretty straight. I was able to cut one using a borrowed table saw, but we returned it and are now left with a circular saw. Mr. Buzzkill went down to the garage with one of our cabinets that needed a stile cut. I was upstairs with our sweet toddler, Ella. We heard alot of noise and smelled some burning wood. After much clamoring and what I guessed was muffled cursing coming from the basement, Mr. BK came up and showed me a cut stile. It was brown and burned on the end which is ok since it will be against a wall anyway- plus we are painting. But he announced the cutting of stiles with circular saw just wasn't working. Agghhhh! If it isn't one thing, it's another it seems. Neither of knew what to do, so I emailed our nice sales support guy who is part owner of thecabinetjoint.com where I purchased our RTA cabinets. He suggested that my husband may have been trying to use a crosscut blade instead of a ripping blade. Ripping blades cut with the grain of the wood. I also researched hard maple which is what our cabinets are made of and found it we were dealing with one of the most difficult species of wood to cut because it's really hard wood. Who knew there was such a difference in blades? Not I or Mr. BK. You learn something new everyday. I also learned we needed a carbide tipped blade to cut this hardwood.


Next day I ran to Lowes and stared at the dozens of blades. They paged the one knowledgeable woodworker. I showed him how there were ripping blades with a few teeth and then finishing blades with more teeth. He suggested I use a finishing blade (but it did not say it was for ripping). Well, knowing our luck, I just purchased both.

 
I was debating on which package to open so I could return the unused one. I called an uncle of mine who wood works and he said open the one with fewer teeth. The regular blades are called framing blades. They are round and they go in the saw. Mr. BK kept repeatedly asking me if I was sure I knew what I was doing. I figured we know about the same amount so what would it hurt to let me do it. He wasn't very happy when I asked him to take my picture for my blog which is thinks is a waste of my time (sigh).

 
So here is me in front yard successfully ripping through the stiles like they were butter! Ha. Can you spot what is wrong with this picture? I've put red Xs to give you a hint.

rippinghardmaple
  1. No shoes. Shame on me. I did wear goggles though.
  2. I really need to get my roots done as you can see.
  3. There is excess glue that did not get wiped off cabinet which will need to be scraped with razor blade now bc it's blocking the feet that are to go under the sink.
  4. My edging job with the blade of weed eater turned 90 degrees did not really go so well as you can see. Ahhhhhh me. I want an edger so bad.
Dry Fitting Sink Base

 
Next, I moved the sink back into the house and it was time to use the hole cutter that attaches to the end of the electric drill. We had our plumber move our pipes to the wall and we needed to drill holes for the pipes to slip through. Mr. BK looked skeptical. He asked me if I was going to be able to measure and make the holes where they needed to be. The more he doubted I could do it, the more determined I became. I am woman hear me roar! I was thinking of the two major things he has done wrong to our precious cabinets that can luckily be fixed with wood putty since we are painting them. I will refrain from describing and posting pictures of these mistakes online because I'm trying to be nice about it. Needless to say, be prepared to go to counseling with your partner after a diy kitchen remodel!!

 
I explained to him that I was planning on coating the ends of each pipe with lipstick and bumping up cabinet next to them so I would have neat little round lipstick holes showing me where to drill. You can imagine any man's reaction to that plan.

IMG_0674b


IMG_0675a

 
But IT WORKED!!!! In fact it worked so well, that I could not pull the cabinet forward again once the pipes were in bc one pipe was really snugly fit and the copper cap was causing it not to be able to be dethreaded back out out so that I could sand the edges of stiles to neaten up my slightly crooked cut. However, I learned two things:

  1. Wipe off lipstick carefully after the pipes are threaded through the holes. I and Mr. BK got it on our hands and the cabinet. Oopsy (smile).
  2. Drill a small hole with regular bit through the lipstick ring and then drill large hole from front side of cabinet so the splintered wood is on the backside.
Then it happened...I noticed the entire cabinet was higher than all the rest of the ones that had already been installed next to them by my husband. I gave up and refrained from crying. Mr. BK (hands covered with red lipstick) was none to happy either. Luckily he spent the next day undoing all his hard work and shimming up the cabinets that were installed so that they aligned with the sinkbase. I made the slight mistake of letting him see me put the 4 foot level over the run of cabinets to just check for myself. Not a good idea. Another reason we will be going to therapy after this is done. Don't worry, we will weather this storm!!!

I may even consider changing Mr. BK's nickname on the blog soon. As I called him at work to ask about something concerning a project and he didn't make one attempt to discourage me. I'm seriously thinking he might be starting to trust me a bit more when it comes to this stuff. I hope so.

Wednesday, August 4, 2010

Attaching Stuff to Morter

Well, like I say in my blog intro....if I (the queen of becoming frustrated and sidetracked) can transform this house then you can certainly rest assured you yourself can tackle a diy project and be successful.

After much arguing and frustration regarding the weeks (did you hear me, WEEKS) of remodeling our kitchen, I decided the true root of the problem was that our basement is chaotic and totally disorganized. Figuring if I could organize the space in about 7 hours, I could alleviate Mr. Buzzkill and I's frustration that comes from losing a tool every ten minutes it seems. So......I decided after surveying the landscape down there in the dark unwaterproofed basement, that we needed to get some tools we commonly use out of corner so we could stop having to climb over the one new and one broken lawn mower and other items to get what we needed. After that, I was planning to totally organize all the tools on the workbench next.

In this segment, hopefully you can benefit from my pain if you don't know how and want to know how to adhere something to morter....say a window box to your brick house. I want to do this eventually, so I'm glad I finally learned how to do so....though I was hot, frustrated, and made 3 trips to our local neighborhood hardware store where a variety of old men viewed me with skepticism each time I walked in asking questions and buying more stuff.

Here is what I accomplished. Next I'll show you how to do it.

IMG_0712

I did this wrong sooooo many times, that I have a very hard time remembering exactly how it all went down....so I'll spare you having to read about all of the mistakes, but I'll attempt to point out any pitfalls along the way.

After digging around in some of Mr. BK's containers filled with odds and ends, I found what I thought would work. I compared it to what he'd done in the past and it seemed to match. To match what I will be telling you to do, you need some of these parasleeve things...
correct

OMG...I just found this link which I so could not find during this project and needed! Agghhh! OK, it cannot be said enough times. Do NOT take apart the parasleeve anchor. Why? Because it expands when you put it in the wall and you can never get it back out! Very impt.

Don't make it look like this... (can you spot the difference here?)
IMG_0689i

Or you'll end up with this problem....as you can see below I can't take off the nut and washer because the wider end of the anchor is sticking out and not in the wall where it should be.
IMG_0690h

Also, don't take off the nut and washer like this, or you'll end up having to hold the anchor in place so it won't get lost in wall while you slip the wood over it.
 IMG_0693e

There are so many do nots that I did, I was left sweating and cursing while trying to hold the screw in place with my jewelry pliers and using a diff pair of pliers to turn the nut. Each time I turned it the screw would turn with it and nothing would tighten. This was due to me removing the plain metal part that goes around the anchor. No picture of this mistake.

So, what do you do...

1. Read the instructions to find out what size mortar drilling bit you need and go buy it.  In my case, the instructions said to drill a minimum of  1.5 inches into the wall and to use the same size drill bit as the anchor. A bit for drilling morter has wings on the side of it as seen below.
IMG_0688j

2. Mark your locations for drilling after using a level to ensure they are level.

3. Drill a hole. You can mark your drill bit if you need to so you know where to stop. I marked mine with magic marker. Wear some goggles and blow the dust out of the hole with something. I used my breath so that probably will cause me some health issues down the road...I hope not! You will be surprised how easy the drill goes into the morter. I was drilling into what I guess is called a cinderblock. Now in pic below you'll notice I've already made a mistake because if you look closely you can see part of the anchor is in the hole. Unfortunately, I didn't get a pic of just the plain hole. But you get the idea here.
hole

3. Now, drill a hole in the wood you want to adhere to the wall. If you are hanging something I guess you can skip this step. I used the masonry bit to drill the wood and it seemed to work fine.

4. Next, position your anchor in the hole in the wood and then in the hole you just drilled in the morter. Do NOT take it apart!! The end with the washer and nut should be towards you. You are going to need to tighten it later.

5. Take a hammer and bang it in. By the time I got this right, I was too tired to take any pictures. Sad, I know.

6. Now, tighten that nut up snug against your board. If you can find one of these, you tighten it around the nut. It fits multiple size nuts. I think it's called a crescent wrench. I don't know if it's spelled like the rolls or not. LOL. Please ignore the filfthy state of garage. Dog hair in pic so I'm posting this small in hopes it's less noticeable.
IMG_0697a

(Off topic....our new fridge makes the most obnoxious noises. It just did. I am told all new ones do this? I hope it's just due to icemaker not being hooked up yet. It could seriously wake up my daughter from her nap!)

7. Give yourself a pat on the back.

(Well cr_p...it did wake her up. I better run!)